![]() The Chevrolet Corvette
Intelligent Operator’s Handheld Manual
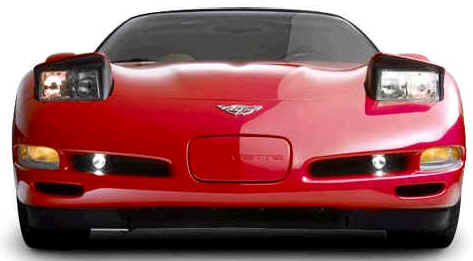
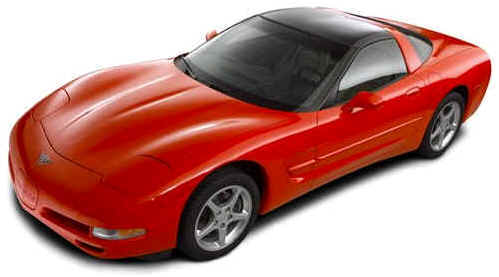
The Chevrolet Corvette
Intelligent Operator’s Handheld Manual
New! The Corvette Intelligent Owner's Manual For Your PHONE
Still Not Finding what you need for your Corvette? Try the Custom Corvette Search Engine for the C5. This search engine is especially designed by the Intelligent Owner’s Manual © and Google.

Quick Find for Features and Controls

|
|
 |
 |
 |
 |
|
|
|
|
|
|
 |
|
 |
|
 |
|
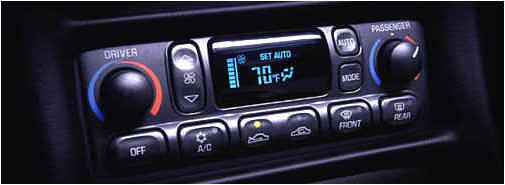
Dual-Zone Temperature Control
Now standard in all Corvette models, dual-zone temperature control lets the driver and passenger adjust the temperature settings for maximum individual comfort.


Here’s an alphabetical listing of almost every subject in this manual. You can use it to quickly find
something you want to read.
Section 2 Features and Controls
Here you can learn about the many standard and optional features on your vehicle, and information on starting, shifting and braking. Also explained are the instrument panel and the warning systems that tell you if everything is working properly -- and what to do if you have a problem.
CAUTION
Unlocked doors can be dangerous. Passengers -- especially children -- can easily open the doors and fall out. When a door is locked, the inside handle won’t open it. Outsiders can easily enter through an unlocked door when you slow down or stop your vehicle. This may not be so obvious: You increase the chance of being thrown out of the vehicle in a crash if the doors aren’t locked. Wear safety belts properly, lock your doors, and you will be far better off whenever you drive your vehicle.
There are several ways to lock and unlock your vehicle.
From the outside, use your door key or the key fob transmitter. If your theft-deterrent system is armed, unlock the doors only with the key or the transmitter to avoid setting off the alarm. See "Universal Theft-Deterrent" in the Index.
To lock the door from the inside, move the lock control on the door forward. To unlock it, move the lock control on the door backward.
Press the power door unlock/lock switch on either door to lock or unlock both doors at once.
If you are leaving the vehicle, take your key, open your door and set the locks from inside. Then get out and
close the door.
Your vehicle has a Remote Function Actuator, or key fob transmitter function that can also lock your vehicle as you walk away from it. See "Remote Function Actuation System’’ in the Index.
MEMORY can store and recall the vehicle settings for the driver’s seat position, the outside rearview mirror position, comfort control temperature, fan speed and mode settings, radio presets, tone, volume, playback mode (AM/FM, Tape or CD), last displayed station, compact disc position and audio tape direction.
The MEMORY buttons are located on the driver’s side door, above the power mirror buttons. The MEMORY buttons can store and recall the vehicle settings for up to three drivers. Use button "1" to store the vehicle settings for the first driver, button "2" for a second driver or press buttons 1 and 2 simultaneously for a third driver.
To store your vehicle settings, press and hold a MEMORY button. The light will glow steady for one second and then flash once when the settings are completed.
To recall your settings, press your MEMORY button. The light above the button will flash until the correct vehicle settings are achieved, then glow for three seconds when completed.
Your memory settings will also be recalled when you press the active door UNLOCK button on the key fob transmitter.
Drivers 1 ,2 and 3 correspond to the order in which your key fob transmitters were programmed. (See "Fob Training" in the Index.)
Memory recall will not work if the vehicle is moving, the ignition key is removed or a power seat, mirror or memory switch is being used. Memory recall will be temporarily interrupted during engine crank.
Remote Function Actuation System
Your vehicle has a passive/active Remote Function Actuation (RFA) system that allows you to lock andunlock your doors, unlock your hatch/trunk lid, turn the panic alarm on and off and disarm or arm your theft-deterrent system. When using one of the key fob transmitters supplied with your vehicle, the passive range distance is as much as 30 feet (9 m) away from the vehicle on the driver’s side and 20 feet (6 m) away on the passenger’s side. The active range distance is as much as 100 feet (30 m) away.
Your vehicle comes standard with two transmitters, and up to three can be matched to your vehlcle. See "Matching Transmitter(s) to Your Vehicle" later in this section.
Your RFA system operates on a radio frequency subject to Federal Communications Commission (FCC) Rules and with Industry Canada.
This device complies with Part 15 of the FCC Rules. Operation is subject to the following two conditions:
This device complies with RSS-210 of Industry Canada. Operation is subject to the following two conditions:
Changes or modifications to this system by other than an authorized service facility could void authorization to use this equipment.
If you ever notice a decrease in the key fob transmitter range, try doing one of the following:
Return to Remote Function Actuation System
You don’t have to do anything for the RFA to work when the passive feature is on.
You can turn on the passive feature by moving the transmitter’s slider switch to ON. Now, when you move toward your vehicle with the key fob transmitter, the system will automatically disarm your theft-deterrent system and unlock the driver’s door or both depending on how the system is programmed. If it’s dark enough outside, your interior lamps will come on.
You can also use the buttons on the transmitter to actively unlock your vehicle. Press UNLOCK once to unlock the driver’s door, or press UNLOCK again within 10 seconds to unlock both doors.
The hatch/trunk lid will unlock when the button with the trunk symbol is pressed, as long as the ignition is turned to the OFF position.
If you move out of range with the slider switch set to ON, the key fob transmitter will:
The system has a feature that makes it difficult for you to lock your keys in your vehicle. If you leave your keys in the ignition and attempt to lock the doors, the vehicle will not lock and a chime will sound to remind you that the keys are in the ignition. If the door lock is pressed again, within five seconds, the doors will lock and the keys can be locked in the car. If you leave the keys in the ignition and move away with the key fob transmitter, the doors still will not lock. You should notice that the horn doesn’t sound and return to get your keys out of the ignition.
The system will allow you to lock your keys in the vehicle if you didn’t leave them in the ignition. You should, however, be able to use the key fob transmitter to get them out as long as the passive slide switch is in the ON position. After 15 seconds of no motion, the key fob transmitter shuts down to save the battery. Wait about 30 seconds, then rock the vehicle. The key fob transmitter should "wake up" and unlock the doors.
This system can’t guarantee that you will never be locked out of your vehicle. If the battery is low or if the key fob transmitter is in a place where the signal can’t get to the antenna, it won’t unlock the doors. Always remember to take your keys with you.
Return to Remote Function Actuation System
When you press the special horn button on the key fob transmitter, your vehicle’s horn will sound. This panic alarm button will allow you to attract attention,if needed.
If the horn alarm sounds, there are three ways to turn it off:
Return to Remote Function Actuation System
You can adjust the settings on the system through the Driver Information Center (DIC). You can have just the driver’s or both door locks passively unlock, change the type of alarm used by the theft-deterrent, or have lamps come on when you approach the vehicle. See "Driver Information Center Controls and Displays" in the Index.
Return to Remote Function Actuation System
Turning the Passive System Off
You can disable the passive feature by moving the transmitter’s slider switch to OFF. The vehicle will no longer automatically disarm your theft-deterrent system or unlock the doors, however, you will be able to actively control use of the door locks, the hatch/trunk lid release and the panic alarm using the four transmitter buttons. (These buttons also work when the passive feature is on.)
Make sure to fully slide the switch to either side when turning the key fob transmitter on and off. You should feel a double click when sliding the switch back and forth.
You can also check whether the passive system is on or off by closing the door and moving away from the vehicle with the keys and transmitter. If the doors lock, the passive system is on.
If you are working around your vehicle and keeping your keys with you, you might want to turn the RFA passive system off. If you don’t, the transmitter will keep locking and unlocking your doors.
Return to Remote Function Actuation System
The active range (using one of the four buttons) of the key fob transmitter is approximately 60 to 100 feet (18 to 30 m). The passive range (having the slider switch set to ON) is approximately 10 to 20 feet (3 to 6 m) on the passenger’s side of the vehicle and 20 to 30 feet (6 to 9 m) on the driver’s side.
Return to Remote Function Actuation System
Resynchronizing Your Transmitter
Your RFA system uses a continually changing code for increased security. Normally, the receiver in your vehicle will keep track of this changing code. , If your vehicle does not respond to your transmitter, do the following to determine what’s wrong:
Loss of synchronization will occur after transmitter battery replacement or disconnection of the vehicle’s battery. If attempts to resynchronize your transmitter to the vehicle are not successful, you may need to match the transmitter to the vehicle.
Return to Remote Function Actuation System
Matching Transmitter(s) To Your Vehicle
Each key fob transmitter is coded to prevent another transmitter from unlocking your vehicle. If a transmitter is lost or stolen, a replacement can be purchased through your dealer. Remember to bring any remaining transmitters with you when you go to your dealer. When the dealer matches the replacement transmitter to your vehicle, any remaining transmitters must also be matched. Once your dealer has coded the new transmitter, the lost transmitter will not unlock your vehicle. Each vehicle can have only three transmitters matched to it.
To match transmitters to your vehicle:
The programming mode will shut off if:
Return to Remote Function Actuation System
Under normal use, the battery in your key fob transmitter should last about 18 months. You can tell the battery is weak if the transmitter won’t work at the normal range in any location. If you have to get close to your vehicle before the transmitter works, it’s probably time to change the battery.
NOTICE:
When replacing the battery, use care not to touch any of the circuitry. Static from your body transferred to these surfaces may damage the transmitter.
Replacing Your Battery
Return to Remote Function Actuation System
Remote Hatch/Trunk Lid Release
To use the remote hatch/trunk lid release on automatic transmission vehicles, your vehicle must be in PARK (P) or NUETRAL (N). For manual transmissions, set the parking brake. See "Parking Brake" in the Index.
Press the button with the trunk symbol on it, located at the left side of the steering column on the instrument panel, to release the hatch/trunk lid from inside your vehicle.
The key fob transmitter will also release the hatch/trunk lid. See "Remote Function Actuation System" in the Index.
If your vehicle is equipped with a hatch and you have lost battery power, use the manual release cables to open the hatch. To access the cables, remove the two access panels located in the rear of the trunk area. There is one cable located underneath each access panel. (See "Storage Compartments" in the Index for more information.)
Pull each cable straight down for each latch to release the hatch.
If your vehicle is equipped with a convertible top and you have lost battery power, use the manual release cable to open the trunk lid. To access the cable, remove the center access panel located in the rear of the trunk area. (See "Storage Compartments" in the Index for more information.)
Pull the cable straight down to release the trunk lid.
CAUTION
It can be dangerous to drive with the hatch/trunk lid open because carbon monoxide (CO) gas can come into your vehicle. You can’t see or smell CO. It can cause unconsciousness and even death.
If you must drive with the hatch/trunk lid open or if electrical wiring or other cable connections must pass through the seal between the body and the hatch/trunk lid:
See "Engine Exhaust" in the Index.
NOTICE:
If you put things in the hatch/trunk area, be sure they won’t break the glass when you close it. Never slam the hatch/trunk lid down. You could break the glass or damage the defogger grid. When you close the hatch/trunk lid, make sure you pull down from the center, not the sides. If you pull the hatch/trunk lid down from the side too often, the weatherstrip can be damaged.
NOTICE:
Do not store heavy or sharp objects in the three storage compartments located in the hatch/trunk area. If you do, the objects could damage the underbody.
Return to Remote Hatch/Trunk Lid Release
Vehicle theft is big business, especially in some cities. Although your vehicle has a number of theft-deterrent features, we know that nothing we put on it can make it impossible to steal. However, there are ways you can help.
Return to Remote Hatch/Trunk Lid Release
If you leave your vehicle with the keys inside, it’s an easy target for joy riders or professional thieves -- so don’t do it. When you park your vehicle and open the driver’s door, you’ll hear a tone reminding you to remove your key from the ignition and take it with you. Always do this. Your steering wheel will be locked, and so will your ignition. If you have an automatic transmission, taking your key out also locks your transmission. And remember to lock the doors.
Return to Remote Hatch/Trunk Lid Release
Park in a lighted spot, close all windows and lock your vehicle. Remember to keep your valuables out of sight. Put them in a storage area, or take them with you.
Return to Remote Hatch/Trunk Lid Release
If you park in a lot where someone will be watching your vehicle, it’s best to lock it up and take your keys. But what if you have to leave your key? Do not leave valuables in your vehicle, since there would be no place to secure them.
Return to Remote Hatch/Trunk Lid Release
Universal Theft-Deterrent System
Your Corvette has a theft-deterrent alarm system. With this system, the SECURITY light will flash as you open the door (if your ignition is off).
This light reminds you to arrn the theft-deterrent system. To arm the system, do the following:
Now, if a door or the hatch/trunk lid is opened without the key or the key fob transmitter system, the alarm will go off. Your horn will sound for two minutes, then it will go off to save battery power. And, your vehicle won’t start.
The theft-deterrent system won’t arm if you lock the doors with a key, the manual door lock, or if you power lock (from the inside) the vehicle after the doors are closed.
If your passenger stays in the vehicle when you leave with the keys, have the passenger lock the vehicle after the doors are closed. This way the alarm won’t arm, and your passenger won’t set it off.
Always use your key or the key fob transmitter to unlock a door. Unlocking a door any other way will set off the alarm. If you do set off the alarm, there are four ways to stop it:
Return To Universal Theft-Deterrent System
If the alarm is inoperative, check to see if the horn works. If not, check the horn fuse. See “Fuses and Circuit Breakers” in the Index. If the horn works, but the alarm doesn’t go off, see your dealer.
Return To Universal Theft-Deterrent System
Your vehicle is equipped with the PASS-Key (Personalized Automotive Security System) theft-deterrent system. PASS-Key is a passive theft-deterrent system. It works when you insert or remove the key from the ignition.
PASS-Key uses a resistor pellet in the ignition key that matches a decoder in your vehicle.
2-18
When the PASS-Key system senses that someone is using the wrong key, it shuts down the vehicle’s starter and fuel systems. For about three minutes, the starter won’t work and fuel won’t go to the engine. If someone tries to start your vehicle again or uses another key during this time, the shutdown period will start over again. This discourages someone from randomly trying different keys with different resistor pellets in an attempt to make a match.
The key must be clean and dry before it’s inserted in the ignition or the engine may not start. If the SECURITY light comes on, the key may be dirty or wet.
If this happens and the starter won’t work, turn theignition off. Clean and dry the key, wait three minutesand try again. If the starter still won’t work, wait three minutes and try the other ignition key. At this time, you may also want to check the fuses (see "Fuses and Circuit Breakers" in the Index). If the starter won’t work with the other key, your vehicle needs service. If your vehicle does start, the first ignition key may be faulty. See your dealer or a locksmith who can service the PASS-Key.
If you accidentally use a key that has a damaged or missing resistor pellet, you will see no SECURITY light. You don’t have to wait three minutes before trying the proper key.
If the resistor pellet is damaged or missing, the starter won’t work. Use the other ignition key, and see your dealer or a locksmith who can service the PASS-Key to have a new key made.
If the SECURITY light comes on while driving, have your vehicle serviced as soon as possible.
If you lose or damage a PASS-Key ignition key, see your dealer or a locksmith who can service PASS-Key.In an emergency, call the Chevrolet Roadside Assistance
Center at 1-800-CHEV-USA (1-800-243-8872). In
Canada, call 1-800-268-6800.
NOTICE:
Your vehicle doesn’t need an elaborate "break-in." But it will perform better in the long run if you follow these guidelines:
With the key in the ignition switch, you can turn the switch to four positions.
OFF: The only position from which you can remove the key. Removing the key locks your steering wheel, ignition and automatic transmission.
If you have an automatic transmission, the ignition switch can’t be turned to OFF unless the shift lever is in PARK (P).
ACC: The position in which you can operate your electrical power accessories. With the key in this position, the automatic transmission and steering column will unlock.
ON: The position to which the switch returns after you start the engine and release the switch. The switch stays in the ON position when the engine is running. But even when the engine is not running, you can use ON to operate your electrical power accessories and to display some instrument panel messages and telltales.
START: Starts the engine. When the engine starts, release the key. The ignition switch will return to ON for normal driving.
When the engine is not running, ACC and ON allow you to operate your electrical accessories, such as the radio.
A warning tone will sound if you open the driver’s door when the ignition is in OFF or ACC and the key is in the ignition.
CAUTION
Removing the key from the ignition switch will lock the steering column and result in a loss of ability to steer the vehicle. This could cause a collision. If you need to turn the engine off while the vehicle is moving, turn the key to ACC.
NOTICE:
If your key seems stuck in OFF and you can’t turn it, be sure you are using the correct key; if so, is it all the way in? Turn the key only with your hand. Using a tool to force it could break the key or the ignition switch. If none of this works, then your vehicle needs service.
Retained Accessory Power (RAP)
With RAP, your power windows and the audio system will continue to work for up to 15 minutes after the ignition key is turned to OFF and neither door is opened. If a door is opened, the audio system and power windows will shut off.
This vehicle has a computer system that monitors engine speed, throttle and pedal position, and records the current status.
Move your shift lever to PARK (P) or NEUTRAL (N). Your engine won’t start in any other position -- that’s a safety feature. To restart when you’re already moving, use NEUTRAL (N) only.
NOTICE:
Don’t try to shift to PARK (P) if your Corvette is moving. If you do, you could damage the transmission. Shift to PARK (P) only when your vehicle is stopped.
Return to Starting Your Engine
The gear selector should be in NEUTRAL (N). Hold the clutch pedal to the floor and start the engine. Your vehicle won’t start if the clutch pedal is not all the way down -- that’s a safety feature.
Return to Starting Your Engine
1. Without pushing the accelerator pedal, turn the ignition key to START. When the engine starts, let go of the key. The idle speed will go down as your engine gets warm.
NOTICE: Holding your key in START for longer than 15 seconds at a time will cause your battery to be drained much sooner. And the excessive heat can damage your starter motor.
2. If it doesn’t start within 10 seconds, push the accelerator pedal all the way to the floor, while you hold the ignition key in START. When the engine starts, let go of the key and let up on the accelerator pedal. Wait about 15 seconds between each try to help avoid draining your battery or damaging your starter.
When starting your engine in very cold weather (below 0°F or -18"C), do this:
NOTICE: Your engine is designed to work with the electronics in your vehicle. If you add electrical parts or accessories, you could change the way the engine operates. Before adding electrical equipment, check with your dealer. If you don’t, your engine might not perform properly. If you ever have to have your vehicle towed, see the part of this manual that tells how to do it without damaging your vehicle. See "Towing Your Vehicle" in the Index.
Return to Starting Your Engine
For your convenience and to avoid damage to your starter, your vehicle is equipped with a starter interlock feature. This feature will not allow you to crank the engine when the vehicle is already running.
Return to Starting Your Engine
Racing or Other Competitive Driving
See your Warranty Book before using your vehicle for racing or other competitive driving.
NOTICE:
If you use your vehicle for racing or other competitive driving, your engine may use more oil than it would with normal use. Low oil levels can damage the engine. Be sure to check the oil level often during racing or other competitive driving and keep the level at or near the upper mark on the engine oil dipstick. You may need to add oil. See "Adding Oil" under "Engine" in the Index.
Return to Starting Your Engine
(Canada Only)
The engine coolant heater is located on the driver’s side of the engine under the manifold. The electrical cord is attached to the generator bracket assembly, between the generator and the windshield washer fluid tank.
In very cold weather, 0 O F (- 18 O C) or colder, the engine coolant heater can help. You’ll get easier starting and better fuel economy during engine warm-up. Usually, the coolant heater should be plugged in a minimum of four hours prior to starting your vehicle.
Return To Engine Coolant Heater
To Use the Engine Coolant Heater
CAUTION
Plugging the cord into an ungrounded outlet could cause an electrical shock. Also, the wrong kind of extension cord could overheat and cause a fire. You could be seriously injured. Plug the cord into a properly grounded three-prong 110-volt AC outlet. If the cord won’t reach, use a heavy-duty three-prong extension cord rated for at least 15 amps.
How long should you keep the coolant heater plugged in? The answer depends on the outside temperature, the kind of oil you have, and some other things. Instead of trying to list everything here, we ask that you contact your dealer in the area where you’ll be parking your vehicle. The dealer can give you the best advice for that particular area.
Return To Engine Coolant Heater
Automatic Transmission Operation
There are several different positions for your shift lever.
PARK (P): This locks your rear wheels. It’s the best position to use when you start your engine because your vehicle can’t move easily.
CAUTION
It is dangerous to get out of your vehicle if the shift lever is not fully in PARK (P) with the parking brake firmly set. Your vehicle can roll. Don’t leave your vehicle when the engine is running unless you have to. If you have left the engine running, the vehicle can move suddenly. You or others could be injured. To be sure your vehicle won’t move, even when you’re on fairly level ground, always set your parking brake and move the shift lever to PARK (P). See "Shifting Into PARK (P)" in the Index.
Be sure the shift lever is fully in PARK (P) range before starting the engine. Your vehicle has a brake-transmission shift interlock. You have to fully apply your regular brakes before you can shift from PARK (P) when the ignition key is in the ON position. If you cannot shift out of PARK (P), ease pressure on the shift lever -- push the shift lever all the way into PARK (P) and release the shift lever button as you maintain brake application. Then press the shift lever button and move the shift lever into the gear you wish. (If you do not apply the brake after 15 seconds once the ignition is turned on, you will receive a PRESS BRAKE BEFORE SHIFT message in the Driver Information Center.) See "Shifting Out of PARK (P)" in the Index.
Return to Automatic Transmission Operation
REVERSE (R): Use this gear to back up.
NOTICE:
Shifting to REVERSE (R) while your vehicle is moving forward could damage your transmission. Shift to REVERSE (R) only after your vehicle is stopped.
To rock your vehicle back and forth to get out of snow, ice or sand without damaging your transmission, see "Stuck: In Sand, Mud, Ice or Snow" in the Index.
NEUTRAL (N): In this position, your engine doesn’t connect with the wheels. To restart when you’re already moving, use NEUTRAL (N) only. Also, use NEUTRAL (N) when your vehicle is being towed.
CAUTION
Shifting out of PARK (P) or NEUTRAL (N) while your engine is "racing" (running at high speed) is dangerous. Unless your foot is firmly on the brake pedal, your vehicle could move very rapidly. You could lose control and hit people or objects. Don’t shift out of PARK (P) or NEUTRAL (N) while your engine is racing.
NOTICE:
Damage to your transmission caused by shifting out of PARK (P) or NEUTRAL (N) with the engine racing isn’t covered by your warranty.
Return to Automatic Transmission Operation
AUTOMATIC OVERDRIVE : This position is for normal driving.
Return to Automatic Transmission Operation
THIRD (3): This position is also used for normal driving, however, it offers more power and lower fuel economy than AUTOMATIC OVERDRIVE (0).
Here are some times you might choose THIRD (3) instead of AUTOMATIC OVERDRIVE (a):
Return to Automatic Transmission Operation
SECOND (2): This position gives you more power but lower fuel economy. You can use SECOND (2) on hills. It can help control your speed as you go down steep mountain roads, but then you would also want to use your brakes off and on.
Return to Automatic Transmission Operation
FIRST (1): This position gives you even more power (but lower fuel economy) than SECOND (2). You can use it on very steep hills, or in deep snow or mud. If the selector lever is put in FIRST (l), the transmission won’t shift into first gear until the vehicle is going slowly enough.
NOTICE:
If your rear wheels can’t rotate, don’t try to drive. This might happen if you were stuck in very deep sand or mud or were up against a solid object. You could damage your transmission. Also, if you stop when going uphill, don’t hold your vehicle there with only the accelerator pedal. This could overheat and damage the transmission. Use your brakes or shift into PARK (P) to hold your vehicle in position on a hill.
Maximum engine speed is limited to protect driveline components from improper operation.
Return to Automatic Transmission Operation
6-Speed
This is your shift pattern. Here’s how to operate your transmission:
FIRST (1): Press the clutch pedal and shift into FIRST (1). Then slowly let up on the clutch pedal as you press the accelerator pedal.
You can shift into FIRST (1) when you’re going less than 40 mph (64 km/h). If you’ve come to a complete stop and it’s hard to shift into FIRST (l), put the shift lever in NEUTRAL (N) and let up on the clutch. Press the clutch pedal back down. Then shift into FIRST (1).
Return To Manual Transmission Operation
SECOND (2): Press the clutch pedal as you let up on the accelerator pedal and shift into SECOND (2). Then, slowly let up on the clutch pedal as you press the accelerator pedal.
Return To Manual Transmission Operation
THIRD (3), FOURTH (4), FIFTH (5) AND SIXTH (6):
Shift into THIRD (3), FOURTH (4), FIFTH (5 ) and SIXTH (6) the same way you do for SECOND (2). Slowly let up on the clutch pedal as you press the accelerator pedal.
To stop, let up on the accelerator pedal and press the brake pedal. Just before the vehicle stops, press the clutch pedal and the brake pedal, and shift to NEUTRAL (N).
Return To Manual Transmission Operation
NEUTRAL (N): Use this position when you start or idle your engine. Your shift lever is in NEUTRAL (N) when it is centered in the shift pattern, not in any other gear.
Return To Manual Transmission Operation
REVERSE (R): To back up, press down the clutch pedal and shift into REVERSE (R). Just apply pressure to get the lever past FIFTH (5 ) and SIXTH (6) into REVERSE (R). Let up on the clutch pedal slowly while pressing the accelerator pedal.
Your six-speed manual transmission has a feature that allows you to safely shift into REVERSE (R) while the vehicle is rolling (at less than 5 mph (8 km/h)). You will be locked out if you try to shft into REVERSE (R) while your vehicle is moving faster than 5 mph (8 km/h). If you have turned your ignition off and wish to park your car in REVERSE (R), you will have to move the shift lever quickly to the right, and immediately forward into gear.
Return To Manual Transmission Operation
Shift Speeds (Manual Transmission)
This chart shows when to shift to the next higher gear for best fuel economy.
If your engine speed drops below 900 rpm, or if the engine is not running smoothly, you should downshift to the next lower gear. You may have to downshift two or more gears to keep the engine running smoothly or for good performance.
NOTICE:
When you are shifting gears, don't move the gearshift lever around needlessly. This can damage parts of the transmission and may require costly repair. Shift directly into the next appropriate gear.
Return To Manual Transmission Operation
One to Four Light (Manual Transmission)
When this light comes on, you can only shift from FIRST (1) to FOURTH (4) instead of FIRST (1) to SECOND (2). You must complete the shift into FOURTH (4) to deactivate this feature. This helps you get the best possible fuel economy.
After shifting to FOURTH (4), you may downshift to alower gear if you prefer.
Return To Manual Transmission Operation
NOTICE:
Do not try to force the shift lever into SECOND (2) or THIRD (3) when the ONE TO FOUR light comes on. Do not try to re-engage FIRST (1) after starting to shift into FOURTH (4). You will damage your transmission. Shift only from FIRST (1) to FOURTH (4) when the light comes on.
This light will come on when:
Return To Manual Transmission Operation
Downshifting (Manual Transmission)
Do not downshift into the gear shown below at a speed greater than shown in the table:
FIRST (1) .................... 50 mph (80 km/h)
SECOND (2) ................ 74 mph (1 19 km/h)
THIRD (3) ................. 101 mph (163 km/h)
FOURTH (4) ............... 130 mph (209 km/h)
NOTICE:
If you skip more than one gear when you downshift, or if you race the engine when you downshift, you can damage the clutch, driveshaft or transmission.
The six-speed transmission has a spring that centers the shift lever near THIRD (3) and FOURTH (4). This spring helps you know which gear you are in when you are shifting. Be careful when shifting from FIRST (1) to SECOND (2) or downshifting from SIXTH (6) to FIFTH (5). The springs will try to pull the gearshift lever toward FOURTH (4) and THIRD (3). Make sure you move the lever into SECOND (2) or FIFTH (5). If you let the lever move in the direction of the pulling, you may end up shifting from FIRST (1) to FOURTH (4) or from SIXTH (6) to THIRD (3).
CAUTION
If you skip more than one gear when you downshift, you could lose control of your vehicle. And you could injure yourself or others. Don’t shift from SIXTH (6) to THIRD (3), FIFTH (5) to SECOND (2) or FOURTH (4) to FIRST (1).
Return To Manual Transmission Operation
To set the parking brake, hold the brake pedal down. Pull the parking brake lever. This sets your parking brake. If the ignition is on, the brake system warning light will come on.
NOTICE:
Driving with the parking brake on can cause your rear brakes to overheat. You may have to replace them, and you could also damage other parts of your vehicle. Make sure the brake warning light is not on before driving.
Return To Manual Transmission Operation
To release the parking brake, hold the brake pedal down. Hold the release button in as you move the brake lever all the way down.
Return To Manual Transmission Operation
(Automatic Transmission Only)
CAUTION:
It can be dangerous to get out of your vehicle if the shift lever is not fully in PARK (P) with the parking brake firmly set. Your vehicle can roll. If you have left the engine running,. the vehicle can move suddenly. You or others could be injured. To be sure your vehicle won’t move, even when you’re on fairly level ground, use the steps that follow.
Leaving Your Vehicle With the Engine Running (Automatic Transmission Only)
CAUTION:
It can be dangerous to leave your vehicle with the engine running. Your vehicle could move suddenly if the shift lever is not fully in PARK (P) with the parking brake firmly set. And, if you leave the vehicle with the engine running, it could overheat and even catch fire. You or others could be injured. Don’t leave your vehicle with the engine running unless you have to.
Torque Lock (Automatic Transmission)
If you are parking on a hill and you don’t shift your transmission into PARK (P) properly, the weight of the vehicle may put too much force on the parking pawl in the transmission. You may find it difficult to pull the shift lever out of PARK (P). This is called "torque lock." To prevent torque lock, set the parking brake and then shift into PARK (P) properly before you leave the driver’s seat. To find out how, see "Shifting Into PARK (P)" in the Index.
When you are ready to drive, move the shift lever out of PARK (P) before you release the parking brake. If torque lock does occur, you may need to have another vehicle push yours a little uphill to take some of the pressure from the parking pawl in the transmission, so you can pull the shift lever out of PARK (P).
Shifting Out of PARK (P) (Automatic Transmission)
Your vehicle has a brake-transmission shift interlock. You have to fully apply your regular brake before you can shift from PARK (P) when the ignition is in the ON position. See "Automatic Transmission Operation" in the Index.
As a prompt, you will see a message in the Driver Information Center (DIC) that will say PRESS BRAKE BEFORE SHIFT within 15 seconds unless the brake is pressed.
If you cannot shift out of PARK (P), ease pressure on the shift lever -- push the shift lever all the way into PARK (P) and release the shift lever button as you maintain brake application. Then press the shift lever button and move the shift lever into the gear you wish.
If you ever hold the brake pedal down but still can’t shift out of PARK (P), try this:
Return To Shifting Out of Park
Parking Your Vehicle (Manual Transmission)
Before you get out of your vehicle, put your manual transmission in REVERSE (R) and firmly apply the parking brake.
Return To Parking Your Vehicle (Manual Transmission)
Parking Over Things That Burn Engine Exhaust
CAUTION
Things that can burn could touch hot exhaust parts under your vehicle and ignite. Don’t park over papers, leaves, dry grass or other things that can burn.
Return To Parking Your Vehicle (Manual Transmission)
CAUTION
Engine exhaust can kill. It contains the gas carbon monoxide (CO), which you can’t see or smell. It can cause unconsciousness and death.
If you ever suspect exhaust is coming into your vehicle:
Return To Parking Your Vehicle (Manual Transmission)
Running Your Engine While You’re Parked (Automatic Transmission)
It’s better not to park with the engine running. But if you ever have to, here are some things to know.
CAUTION
Idling the engine with the climate control system off could allow dangerous exhaust into your vehicle (see the earlier Caution under "Engine Exhaust").
Also, idling in a closed-in place can let deadly carbon monoxide (CO) into your vehicle even if the fan switch is at the highest setting. One place this can happen is a garage. Exhaust, with CO, can come in easily. NEVER park in a garage with the engine running.
Another closed-in place can be a blizzard. (See "Blizzard" in the Index.)
Return To Running Your Engine While You're Parked
CAUTION
It can be dangerous to get out of your vehicle if the shift lever is not fully in PARK (P) with the parking brake firmly set. Your vehicle can roll. Don’t leave your vehicle when the engine is running unless you have to. If you’ve left the engine running, the vehicle can move suddenly. You or others could be injured. To be sure your vehicle won’t move, even when you’re on fairly level ground, always set your parking brake and move the shift lever to PARK (P).
Follow the proper steps to be sure your vehicle won’t move. See "Shifting Into PARK (P)" in the Index.
Return To Running Your Engine While You're Parked
Your limited-slip rear axle can give you additional traction on snow, mud, ice, sand or gravel. It works like a standard axle most of the time, but when one of the rear wheels has no traction and the other does, this feature will allow the wheel with traction to move the vehicle.
Return To Limited-Slip Rear Axle
Selective Real Time Damping (Option)

You may have a ride control system on your vehicle called Selective Real Time Damping (SRTD). The system provides the following performance benefits:
This knob is on the center console. Turn it to select the suspension characteristic of your choice.
Return To Selective Real Time Damping
TOUR: Use for normal city and highway driving. Provides a smooth, soft ride.
Return To Selective Real Time Damping
SPORT: Use where road conditions or personal preference demand more control. Provides more "feel," or response to the road conditions.
Return To Selective Real Time Damping
PERF: Use for performance driving. Provides a tight, firm ride and precise response to road conditions.
You can select a setting at any time. Based on road conditions, steering wheel angle and your vehicle speed, the system automatically adjusts to provide the best ride and handling. Select a new setting whenever driving conditions change.
There are three Driver Information Center messages that are displayed when a malfunction occurs with the SRTD system. Refer to "Driver Information Center Warnings and Messages’’ in the Index.
Return To Selective Real Time Damping
With power windows, switches on the door control each window when the ignition is on or when RAP is present. (See "Retained Accessory Power" in the Index.)
Return To Selective Real Time Damping
Both the driver’s and passenger’s window switches have an express-down feature. Press AUTO and hold for less than one-third of a second and release. The window will lower completely. To stop express-down feature from the lowering the window completely, simply press the switch again.
You can also open the window any amount by pressing and releasing the switch.
Return To Selective Real Time Damping
To sound the horn, press either horn symbol on your steering wheel.
A tilt wheel allows you to adjust the steering wheel.
You can also raise it to the highest level to give your legs more room when you exit and enter the vehicle.
To tilt the wheel, hold the steering wheel and pull the lever toward you. Move the steering wheel to a comfortable level, then release the lever to lock the wheel into place.
Turn Signal Multifunction Lever
The multifunction lever on the left side of the steering column includes your:
Return To Turn Signal Multifunction Lever
The turn signal has two upward (for right) and two downward (for left) positions. These positions allow you to signal a turn or a lane change.
To signal a turn, move the multifunction lever all the way up or down. When the turn is finished, the lever will return automatically.
A chime will remind you if you leave your turn signal on for more than 3/4 of a mile (1.2 km) of driving.
A green arrow on the instrument cluster will flash in the direction of the turn or lane change.
To signal a lane change, just raise or lower the lever until the arrow starts to flash. Hold it there until you complete your lane change. The lever will return by itself when you release it.
As you signal a turn or a lane change, if the arrows flash faster than normal, a signal bulb may be burned out.
If a bulb is burned out, replace it to help avoid an accident. If the arrows don’t go on at all when you signal a turn, check the fuses and check for burned-out bulbs. (See "Fuses and Circuit Breakers" in the Index.)
Return To Turn Signal Multifunction Lever
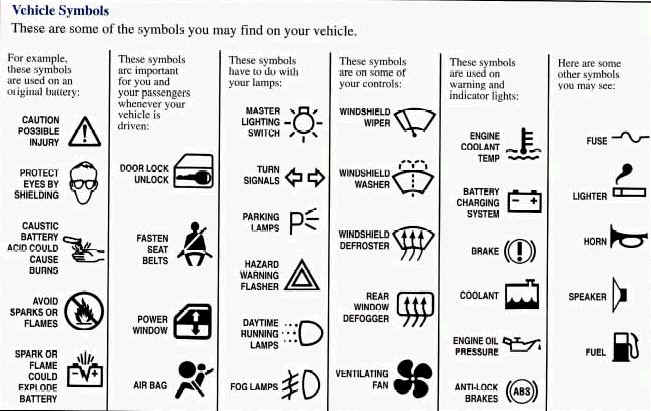
The headlamp band controls these lamps:
![]() Turn the
band to this symbol to turn on your headlamps and other operating lamps.
Turn the
band to this symbol to turn on your headlamps and other operating lamps.
![]() Turn the band to this symbol to turn on
your parking and other operating lamps withoutyour headlamps.
Turn the band to this symbol to turn on
your parking and other operating lamps withoutyour headlamps.
Turn the band to OFF to turn off the lamps. To read your odometer with the ignition off, turn on your parking lamps.
Return To Turn Signal Multifunction Lever
The headlamp doors are designed to open when you turn the headlamps on, and close when you turn the headlamps and parking lamps off. If you turn the headlamps on, then turn the headlamp switch back to the parking lamps setting, the headlamp doors will stay open.
You can open the doors manually using the knob next to the headlamp assembly. Turn the knob to the left until the doors are open.
The headlamp doors should be open when driving in icy or snowy conditions to prevent the doors from freezing closed and when washing the vehicle to help clean the headlamps.
NOTICE:
In order to avoid possible contact of the hood to the headlamp doors, care should be taken in raising the hood with the headlamps up, or shut off the lamps prior to opening the hood.
Return To Turn Signal Multifunction Lever
If you turn the ignition off and leave the headlamps or parking lamps on and open the door, you will hear a chime.
Return To Turn Signal Multifunction Lever
Headlamp High/Low-Beam Changer

To change the headlamps signal lever all the from low beam to high or high to low, push the turn all the way forward.
When the high beams are on, this light on the instrument panel also will be on. To change the headlamps from high to low, pull the lever rearward.
Return To Turn Signal Multifunction Lever
Momentarily pull the turn signal lever toward you. The high-beam indicator will flash to indicate to the other driver that you intend to pass. If the low-beam headlamps are off and you have the optional fog lamps on, the fog lamps will flash.
Return To Turn Signal Multifunction Lever
You can control the windshield wipers by moving the lever with the wiper symbol on it. This lever is located on the right side of your steering column.
For a single wiping cycle, push the lever down to MIST. Hold it there until the wipers start, then let go. The wipers will stop after one cycle. If you want more cycles, hold the lever on MIST longer.
You can set the wiper speed for a long or short delay between wipes. This can be very useful in light rain or snow. Push the lever up to INT (intermittent), then turn the band, located on the lever, to adjust the delay time. Rotate the band up for a shorter delay, down for a longer delay. The wiper speed can only be adjusted when the lever is in the INT position, not in HI or LO.
For steady wiping at low speed, move the lever up to the LO position. For steady high-speed wiping, move the lever up further, to HI. To stop the wipers, move the lever down to OFF.
Be sure to clear ice and snow from the wiper bladesbefore using them. If they’re frozen to the windshield, carefully loosen or thaw them. If your blades do become damaged, get new blades or blade inserts. Heavy snow or ice can overload your wipers. A circuit breaker will stop them until the motor cools. Clear away snow or ice to prevent an overload.
Return To Turn Signal Multifunction Lever
The lever on the right side of your steering column also controls your windshield washer. There is a push button at the end of the lever. To spray washer fluid on the windshield, push the button and hold it. The washer will spray until you release the button. The wipers will continue to clear the window for about six seconds after the button is released and then stop or return to your preset speed.
CAUTION
In freezing weather, don’t use your washer until the windshield is warmed. Otherwise the washer fluid can form ice on the windshield, blocking your vision.
If the fluid in the windshield washer fluid reservoir is low, the message LOW WASHER FLUID will appear on the Driver Information Center (DIC) display. It will take 60 seconds after the bottle is refilled for this message to turn off. For information on the correct washer fluid mixture to use, see "Windshield Washer Fluid" and "Recommended Fluids and Lubricants" in the Index.
Return To Turn Signal Multifunction Lever

With cruise control, you can maintain a speed of about 25 mph (40 km/h) or more without keeping your foot on the accelerator. This can really help on long trips. Cruise control does not work at speeds below about 25 mph (40 km/h).
When using cruise control, the accelerator pedal will return to its fully-released position and will not move while cruise control. is engaged.
The Driver Information Center (DIC) will display the cruise set speed in a digital number. For example, the DIC will say CRUISE SET 60 mph (97 km/h). When you apply your brakes or push the clutch pedal, the cruise control disengages. The DIC will show CRUISE DISENGAGED. See "DIC Warnings and Messages" in the Index.
CAUTION
If your vehicle is in cruise control when the traction control system begins to limit wheel spin, the cruise control will automatically disengage. (See "Traction Control System" in the Index.) When road conditions allow you to safely use it again, you may turn the cruise control back on.
Return To Turn Signal Multifunction Lever
CAUTION:
If you leave your cruise control switch on when you’re not using cruise, you might hit a button and go into cruise when you don’t want to. You could be startled and even lose control. Keep the cruise control switch off until you want to use it.
Return To Turn Signal Multifunction Lever
Suppose you set your cruise control at a desired speed and then you apply the brake or clutch pedal. This, of course, disengages the cruise control. But you don’t need to reset it.
Once you’re going about 25 mph (40 km/h) or more, you can move the cruise control switch to R/A (Resume/Accelerate) for about half a second. The Driver Information Center (DIC) will display the cruise set speed.
You’ll go right back up to your chosen speed and stay there.
Return To Turn Signal Multifunction Lever
Increasing Speed While Using Cruise Control
There are two ways to go to a higher speed:
The DIC will display the cruise set speed.
Return To Turn Signal Multifunction Lever
Reducing Speed While Using Cruise Control
There are two ways to reduce your speed while using cruise control:
Return To Turn Signal Multifunction Lever
Passing Another Vehicle While Using Cruise Control
Use the accelerator pedal to increase your speed. When you take your foot off the pedal, your vehicle will slow down to the cruise control speed you set earlier.
Return To Turn Signal Multifunction Lever
How well your cruise control will work on hills depends upon your speed, load and the steepness of the hills. When going downhill, you may have to brake or shift to a lower gear to keep your speed down. Of course, applying the brake takes you out of cruise control. Many drivers find this to be too much trouble and don’t use cruise control on steep hills.
Return To Turn Signal Multifunction Lever
There are two ways to turn off the cruise control:
The DIC will display the message "CRUISE DISENGAGED."
Return To Turn Signal Multifunction Lever
When you turn off the cruise control or the ignition, your cruise control set speed memory is erased.
Return To Turn Signal Multifunction Lever
Daytime Running Lamps (DRL) can make it easier for others to see the front of your vehicle during the day. DRL can be helpful in many different driving conditions, but they can be especially helpful in the short periods after dawn and before sunset.
The DRL system will make your front turn signal lamps come on when:
When the DRL are on, only your front turn signal lamps will be on. The taillamps, sidemarker and other lamps will not be on. When you turn on your headlamps, your front turn signal lamps (DRL) will go out. The other lamps that come on with your headlamps will also come on.
On vehicles built for Canada, when it’s dark enough outside, your front turn signal lamps will automatically go out and your headlamps will come on. The other lamps that come on with your headlamps will also come on. When it’s bright enough outside, the headlamps will go off, and your front turn signal lamps (DRL) will come on.
Also on Canadian vehicles, there is a light sensor in the defroster grille, at the base of the windshield and the instrument panel. This sensor makes the DRL work automatically, so be sure it isn’t covered.
As with any vehicle, you should turn on the regular headlamp system when you need it.
Use your fog lamps for better vision in foggy or misty conditions. Your parking lamps or low-beam headlamps must be on or your fog lamps won’t work.
To turn the fog lamps on, push the button located on the instrument panel to the left of the steering column. A light on the button will come on when the fog lamps are on. Push the button again to turn the fog lamps off.
Instrument Panel Brightness Control
This button controls the brightness of your instrument panel lights when your headlamps or parking lamps are on.
Push and release the button and it will pop out. Turn the button clockwise (to the right) to brighten the lights or counterclockwise (to the left) to dim them.
The instrument panel brightness knob has an added feature called Parade Mode to assist you in seeing certain instrument panel controls if your headlamps are on in the daylight. Right before turning the courtesy lamps on by turning the button all the way to the right, the radio, Driver Information Center (DIC) display and heating and air conditioning controls will come on at their maximum brightness. This will occur only with the parking lamps or headlamps on.
When any door or the hatch/trunk lid is opened, the interior lamps will go on (unless it’s bright outside). The lamps will stay on for about 30 seconds or until you turn on the ignition.
You can also turn on the courtesy lamps by turning the interior brightness control button all the way to the right.
Be sure not to have this knob turned all the way down with the lamps on during the day. Your Driver Information Center (DIC) may not be visible.
Your inside rearview mirror includes two reading lamps. The lamps will go on when a door is opened. When the doors are closed and the ignition is on, each lamp can be turned on individually by moving the switch (each lamp has its own switch) to ON.
There is also an interior console flood lamp located underneath the rearview mirror which comes on with the headlamps or parking lamps.
If the underhood lamp, vanity mirror lamps, reading lamps, console or glove box lamps are accidentally left on, the power load will time out after 15 minutes. To reset it, all of the above lamps must be turned off or the key must be in the ON position.
Inside Day/night Rearview Mirror
An inside rearview mirror is attached above your windshield. The mirror has pivots so that you can adjust it. You can adjust the mirror for day or night driving. Pull the tab for night driving to reduce glare. Push the tab for daytime driving.
Powerheated Remote Control Mirrors
The electric mirror control is on the driver’s door. To adjust either mirror, press the LT (left) or RT (right) switch to select the mirror, then press the arrows to adjust the direction of the mirror. The selected mirror will stay on for 20 seconds after the last adjustment. An indicator light will come on above the mirror that you select.
Your preferred mirror position can be stored if you have the memory option. See "Memory" in the Index.
For operation of the heated outside mirrors, see "Rear Window Defogger" in the Index.
Your passenger’s side mirror is convex. A convex mirror’s surface is curved so you can see more from the driver’s seat.
CAUTION
A convex mirror can make things (like other vehicles) look farther away than they really are. If you cut too sharply into the right lane, you could hit a vehicle on your right. Check your inside mirror or glance over your shoulder before changing lanes.
The cupholder is located on the center console. To open it, place your thumb on the left side of the lid and raise the right side with your index finger.
Return To Storage Compartments
To use this storage area, pull up the lid on the driver's side front edge of the console and swing it to the passenger's side.
You can use the key to lock and unlock the console. Don't leave the key in the lock, or it could be damaged when the driver sits down.
The fuel fill door release and accessory outlet are located inside the console.
Return To Storage Compartments
The security shade can provide hidden storage in the rear area of your vehicle. The shade is also helpful in blocking the glare from the removable roof when it is stored in the rear compartment.
Return To Storage Compartments
Return To Storage Compartments
There are three rear storage compartments in the floor of the rear hatch/trunk area.
To access the center storage compartment, pull up on the two latches to release the carpet lid.
Remove the carpet lid. There are two other storage compartments, one on each side of the center compartment. Each of these compartments has one latch which operates the same as the two on the center carpet lid.
NOTICE:
If your vehicle has a compact disc player, it is stored in the center rear storage compartment. To help avoid damage to the compact disc player, do not store items such as liquids or sharp objects that could puncture or cut the compact disc player or wiring.
NOTICE:
Do not store heavy or sharp objects in the three storage compartments located in the hatch/trunk area. If you do, the objects could damage the underbody.
Return To Storage Compartments
Your vehicle may have a convenience net. You will see it on the back wall of the rear area of the vehicle.
Put small loads, like grocery bags, in the net. It can help keep them from falling over during sharp turns or quick starts and stops. The net is not for larger, heavier loads.
You can unhook the net and place it in one of the rear storage pockets when you are not using it. On coupe models only, a vinyl storage bag has also been provided.
Return To Storage Compartments
The ashtray is located on the instrument panel, next to the lighter. To use the ashtray, lift up on the bottom of the door.
NOTICE:
Don’t put papers and other things that burn into your ashtray. If you do, cigarettes or other smoking materials could set them on fire, causing damage.
NOTICE:
Loose objects (such as paper clips) can lodge behind and beneath the ashtray lid and prevent movement of the lid. Avoid putting small loose objects near the ashtray.
To use the lighter, push it in all the way and let go. When it’s ready, it will pop back by itself.
NOTICE:
Don’t hold a cigarette lighter in with your hand while it is heating. If you do, it won’t be able to back away from the heating element when it’s ready. That can make it overheat, damaging the lighter and the heating element.
Return To Storage Compartments
To block out glare, you can swing down the visors. You can also swing them to the side.
Return To Storage Compartments
Pull down the sun visor and lift the cover to expose the vanity mirror. When the cover is lifted, the lamps will come on automatically, even if the ignition is off.
Return To Storage Compartments
This outlet is located inside the center console, on the forward left side. Remove the tethered cap to use the outlet. The outlet can be used to connect electrical equipment such as a cellular phone or CB radio. Be sure to follow the installation instructions included with the equipment. Replace the cap when the outlet is not in use.
NOTICE:
When using the accessory outlet:
We recommend that you see a qualified technician or your dealer for the proper installation of your equipment.
Your vehicle’s floor mats are specially designed to remain in position under your feet and out of reach of the accelerator pedal. The driver’s side floor mat is held in place by two locator hooks and the passenger’s side is held in place by one.
Be sure that the driver’s side floor mat is properly placed on the floor so that it does not block the movement of the accelerator pedal.
Return To Storage Compartments
How to Remove and Replace the Floor Mats Roof Panel (Coupe)
To remove the floor mats, pull up on the rear of the mat to disconnect from the locator hooks.
To reinstall the floor mats, line up the openings in the floor mat over the locator hooks and push down into place.
For proper cleaning instructions of the carpeted floor mats, see "Fabric Protection" in the Index.
Return To Storage Compartments
CAUTION:
Don’t try to remove the roof panel while the vehicle is moving. Trying to remove the roof panel while the vehicle is moving could cause an accident. The panel could fall into the vehicle and cause you to lose control, or it could fly off and strike another vehicle. You or others could be injured. Remove the roof panel only when the vehicle is parked.
Until you are sure you can remove the panel alone, have someone help you.
NOTICE:
To avoid damage to the roof panel, paint and weatherstripping do not drop or rest it on its edges. Place the roof panel in the egg-shaped stowage receivers after removing it from the vehicle.
CAUTION
If the roof panel is not stored properly, it could be thrown about the vehicle in a crash or sudden maneuver. People in the vehicle could be injured. Whenever you store the roof panel in the vehicle, always be sure that it is stored securely in the rear area using the storage pins.
NOTICE:
To avoid damage to the roof panel, paint and weatherstripping, do not drop or rest it on its edges. Place the roof panel in the egg-shaped stowage receivers after removing it from the vehicle.

CAUTION:
An improperly attached roof panel may fall into or fly off the vehicle. You or others could be injured. After installing the roof panel, always check that it is firmly attached by pushing up on the underside of the panel. Check now and then to be sure the roof panel is firmly in place.
NOTICE:
To avoid damage to the roof panel, paint and weatherstripping, do not drop or rest it on its edges.
The following procedures explain the proper operation of your convertible top.
NOTICE:
Certain automatic car washes may cause damage to your vehicle. The top fabric can be damaged by top cleaning brushes.
For care and cleaning of your convertible top, see "Cleaning Your Convertible Top" in the index.
When lowering and raising the covertible top, you will use the following:
A. Front Edge of the Convertible Top
B. Rear Edge of the Convertible Top
C. Storage Compartment Lid
Return To Convertible (Option)
NOTICE:
Don’t leave your convertible out with the top down for any long periods of time. The sun and rain can damage your seat material and other things inside your vehicle.
1. Set the parking brake firmly. Shift an automatic transmission into PARK (P). Shift a manual transmission into REVERSE (R). Turn the ignition key to OFF. Lower both sunshades and rotate them toward the door glass.
NOTICE:
Before lowering the convertible top into the storage area, be sure there are no objects in the way of the folded, stored top. The weight of a stored top on items in the storage area may cause the convertible top back glass to break.
2. Unlock the front of the convertible top by lowering the latch handles and turning them inward. Push the latch handles back to the up position.
3. Lift upward on the front edge (A) of the convertible top off of the windshield frame. Then lift upward on the rear edge (B) of the convertible top to be vertical off the storage compartment lid (C). The front edge (A) and rear edge (B) should be straight up and down.
4. Tilt the driver’s seatback forward and press the storage compartment release button located on the underside of the storage compartment lid (C) behind the driver’s seat. Then raise the storage compartment lid (C). While attempting to raise the lid, if the lid does not release and you hear three chimes, check to make sure the trunk lid is closed. Also, the lid will not release if the alarm is turned on or the trunk lid is open.
After pressing the release button, the driver and passenger door glass should retract to the full-down position.
If your vehicle has lost battery power, you canstill open the storage compartment lid (C) using the manual release cable.
The cable is located underneath the carpeting behind the driver and passenger seats in the center of the vehicle. When using the manual release, you must first open the doors to prevent damage to the seals. To access the cable, lift and pull back the carpeting. Then pull the cable to release the storage compartment lid if needed.
NOTICE:
Be sure that the rear edge (B) of the convertible top is in the full-down position before lowering the top into the storage compartment or damage to the top may occur.
5. Push forward on the front edge (A) of the convertible top to allow the rear edge (B) of the convertible top to be rotated to its full-down position.
6. Then move the top rearward to its fully-stored position.
7. After the top is stored, apply one even push on the center of the front edge (A) of the convertible top to assure the top is fully retracted.
8. Close the storage compartment lid (C) by closing with a swift firm motion.
Return To Convertible (Option)
1. Park on a level surface, set the parking brake firmly and shift an automatic transmission into PARK (P). Shift a manual transmission into REVERSE (R). Lower both windows and sunshades and turn the ignition key to OFF.
2. Tilt the driver’s seat forward and press the storage compartment release button, or use the manual release cable if battery power has been lost. Lift the storage compartment lid (C). (After pressing the release button, the driver and passenger door glass should retract to the full-down position, if they have not already been lowered.)
3.Pull the top up by firmly gripping the front edge (A) of the convertible top with your hand and applying a brisk firm upward and forward motion to get the top in the full-up position.
4.Lift the rear edge (B) of the convertible top to its full-up position by first raising the front edge (A).
5.Close the storage compartment lid (C) by closing with a swift, firm motion.
6.Lower the rear edge (B) of the convertible top by first slightly pushing the front edge (A) of the convertible top forward.
7. Push the front edge (A) of the convertible top down from the outside of the vehicle, or pull the front edge (A) of the convertible top down from the center pull-down handle located in the inside of the vehicle. Rotate the latches outward to secure the top in the up position.
Return To Convertible (Option)
2-74
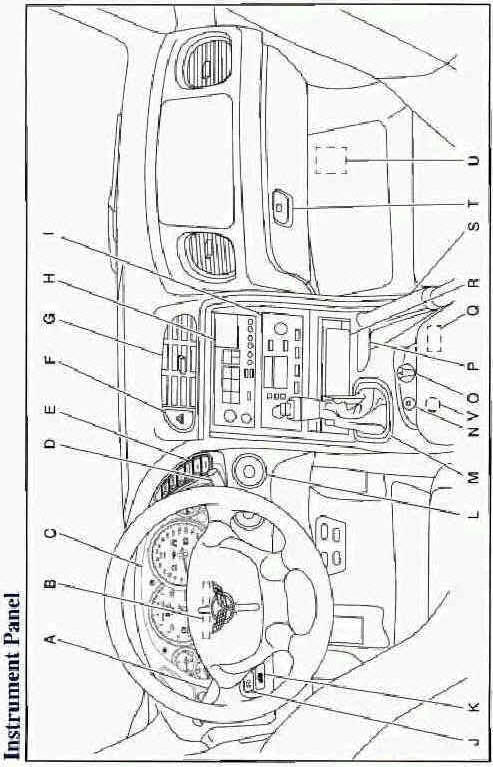
A. Turn Signal/Multifunction Lever
B. Driver Information Center (DIC)
D. Windshield Wipermasher Lever
E. DIC Buttons
E Hazard Warning Flasher Button
G. Center Air Vent
H. Audio System
I. Comfort Controls
J. Fog Lamp Button (Option)
K. Remote Hatch Release Button (Coupe) or Remote
Trunk Release Button (Convertible)
L. Ignition Switch
M. Shift Lever (Automatic Shown)
N. Traction Control System (TCS) Switch
0. Selective Real Time Damping (Option)
P. Instrument Panel Cupholder
Q. Remote Fuel Door Release Button
R. Ashtray & Cigarette Lighter
S. Parking Brake
T. Glove Box
U. Instrument Panel Fuse Block
V. Power Accessory Outlet
2-75
Return To Features and Controls
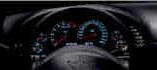
Your instrument cluster and Driver Information Center (DIC) are designed to let you know at a glance how your vehicle is running. You’ll know how fast you’re going, about how much fuel you have left and many other things you’ll need to know to drive safely and economically.
Return To Driver Information Center
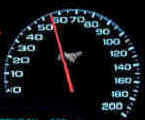
Your speedometer lets you see your speed in either miles per hour (mph) or kilometers per hour (km/h). You may note that there are not two separate scales for mph and km/h.
When you press the E M (EnglishMetric) button on the Driver Information Center (DIC), the cluster will calculate the proper speed and move the needle to the correct position. Either the MPH or the km/h telltale will illuminate, depending on which measurement you choose.
Return To Driver Information Center
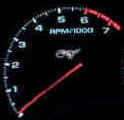
The tachometer displays the engine speed in thousands of revolutions per minute (rpm).
Fuel will shut off at about 6200 rpm.
If you continue to drive your vehicle at the fuel shut off rpm, you could damage your engine. Be sure to operate your vehicle below the fuel shut off rpm or reduce your rpm quickly when the fuel shuts off.
Return To Driver Information Center
Warning Lights, Gages and Messages
This part describes the warning lights and gages that may be on your vehicle. The pictures will help you locate them.
Warning lights and gages can signal that something is wrong before it becomes serious enough to cause an expensive repair or replacement. Paying attention to your warning lights and gages could also save you or others from injury.
Warning lights come on when there may be or is a problem with one of your vehicle’s functions. As you will see in the details on the next few pages, some warning lights come on briefly when you start the engine just to let you know they’re working. If you are familiar with this section, you should not be alarmed when this happens.
Gages can indicate when there may be or is a problem with one of your vehicle’s functions. Often gages and warning lights work together to let you know when there’s a problem with your vehicle.
When one of the warning lights comes on and stays on when you are driving, or when one of the gages shows there may be a problem, check the section that tells you what to do about it. Please follow this manual’s advice. Waiting to do repairs can be costly -- and even dangerous. So please get to know your warning lights and gages. They’re a big help.
Your vehicle also has a Driver Information Center that works along with the warning lights and gages. See "Driver Information Center" in the Index.
Return To Driver Information Center
When the key is turned to ON or START, a chime will come on for about eight seconds to remind people to fasten their safety belts, unless the driver’s safety belt is already buckled.
The safety belt light will also come on and stay on until the driver’s belt is buckled.
Return To Driver Information Center

There is an air bag readiness light on the instrument’ panel, which shows a deployed air bag symbol. The system checks the air bag’s electrical system for malfunctions. The light tells you if there is an electrical problem. The system check includes the air bag sensors, the air bag modules, the wiring and the diagnostic module. For more information on the air bag system, see "Air Bag" in the Index.
This light will come on when you start your engine, and it will flash for a few seconds. Then the light should go out. This means the system is ready.
If the air bag readiness light stays on after you start the engine or comes on when you are driving, your air bag system may not work properly. Have your vehicle serviced right away.
The air bag readiness light should flash for a few seconds when you turn the ignition key to ON. If the light doesn’t come on then, have it fixed so it will be ready to warn you if there is a problem.
Return To Driver Information Center
When the key is in the ON position with the engine not running, the voltmeter shows the voltage output of your battery. When the engine is running, it shows the voltage output of the charging system.
The reading will change as the rate of charge changes (with engine speed, for example), but if the voltmeter reads at 9 volts or below, your instrument panel and other systems may shut down. The Driver Information Center (DIC) will read LOW VOLTAGE when your vehicle is at 10 volts or below. Have it checked right away. Driving with the voltmeter reading at 10 volts or below could drain your battery and disable your vehicle.
Return To Driver Information CenterReturn To Driver Information Center
Your vehicle’s hydraulic brake system is divided into two parts. If one part isn’t working, the other part can still work and stop you. For good braking, though, you need both parts working well.

This light should come on when you turn the ignition key to START. If it doesn’t come on then, have it fixed so it will be ready to warn you if there’s a problem.
If this warning light stays on after you start the engine,the parking brake may not be set or there could be a brake problem. Refer to "Parking Brake" in the Index to see if it is set. If the parking brake is not set, have your brake system inspected right away.
If the light comes on while you are driving and you have a LOW -BRAKE FLUID message showing on the DIC, pull off the road and stop carefully. You may notice that he pedal is, harder to push. Or, the pedal may go closer to the floor. engine and may stay on for on, have the vehicle towed for service. (See "Towing
on when you start your It may take longer to stop. If the light is still system, the light will come t
Return To Driver Information Center
Anti-Lock Brake System Warning Light

With the anti-lock brake several seconds. Your Vehicle" in the Index.)
That’s’normal.
Your brake system may not be working properly if the brake warning light is on. Driving with the brake warning light on can lead to an accident. If the light is still on after you’ve pulled off the road and stopped carefully, have the vehicle towed for service.
If the light stays on, turn the ignition to OFF. Or, if the light comes on when you’re driving, stop as soon as possible and turn the ignition off. Then start the engine again to reset the system. If the light still stays on, or comes on again while you’re driving, your vehicle needs service. If the regular brake system warning light isn’t on, you still have brakes, but you don’t have anti-lock brakes. If the regular brake system warning light is also on, you don’t have anti-lock brakes and there’s a problem with your regular brakes. See "Brake System Warning Light" earlier in this section.
The anti-lock brake system warning light should come on briefly when you turn the ignition key to ON. If the light doesn’t come on then, have it fixed so it will be ready to warn you if there is a problem.
2-80
Traction Control System (TCS) Light
This light should come on briefly as you start the engine. If the light doesn’t come on then, have it fixed so it will be ready to warn you if there’s a problem.
If it stays on, or comes on and the DIC shows a SERVICE TRACTION SYSTEM message when you’re driving, there’s a problem with your TCS system and your vehicle needs service. When this light is on, the system will not limit wheel spin. Adjust your driving accordingly. If the driver turns off the Traction Control System by pressing the button on the console, the TCS system light will come on and the TRACTION SYSTEM OFF message will show on the DIC.
Return To Driver Information Center
Engine Coolant Temperature Gage
This gage shows the engine coolant temperature. If the gage pointer moves into the shaded area, your engine is too hot!
This means that your engine coolant has overheated. If you have been operating your vehicle under normal driving conditions, you should pull off the road, stop your vehicle and turn off the engine as soon as possible.
(The larger tic marks are in increments of 30 degrees below 220°F (104°C) and in increments of 10 degrees above 220 F (104"C).)
In "Problems on the Road," this manual shows what to do. See "Engine Overheating’’ in the Index.
Return To Driver Information Center
Your vehicle is equipped with a computer which monitors operation of the fuel, ignition and emission control systems.
This system is called OBD I1 (On-Board Diagnostics-Second Generation) and is intended to assure that emissions are at acceptable levels for the life of the vehicle, helping to produce a cleaner environment. The CHECK ENGINE light comes on to indicate that there is a problem and service is required. Malfunctions often will be indicated by the system before any problem is apparent. This may prevent more serious damage to your vehicle. This system is also designed to assist your service technician in correctly diagnosing any malfunction.
NOTICE:
If you keep driving your vehicle with this light on, after a while, your emission controls may not work as well, your fuel economy may not be as good and your engine may not run as smoothly.
This could lead to costly repairs that may not be covered by your warranty. This light should come on, as a check to show you it is working, when the ignition is on and the engine is not running. If the light doesn’t come on, have it repaired. This light will also come on during a malfunction in one of two ways:
Return To Driver Information Center
The following may prevent more serious damage to your vehicle:
If the light stops flashing and remains on steady, see "If the Light Is On Steady" following. If the light continues to flash, when it is safe to do so, stop the vehicle. Find a safe place to park your vehicle. Turn the key off, wait at least 10 seconds and restart the engine. If the light remains on steady, see "If the Light Is On Steady" following. If the light is still flashing, follow the previous steps, and drive the vehicle to your dealer or qualified service center for service.
Return To Driver Information Center
You may be able to correct the emission system malfunction by considering the following:
Did you just drive through a deep puddle of water?
If so, your electrical system may be wet. The condition will usually be corrected when the electrical system dries out. A few driving trips should turn the light off.
Have you recently changed brands of fuel?
If so, be sure to fuel your vehicle with quality fuel (see "Fuel" in the Index). Poor fuel quality will cause yourengine not to run as efficiently as designed. You may notice this as stalling after start-up, stalling when you put the vehicle into gear, misfiring, hesitation on acceleration or stumbling on acceleration. (These conditions may go away once the engine is warmed up.) This will be detected by the system and cause the light to turn on.
If you experience one or more of these conditions, change the fuel brand you use. It will require at least one full tank of the proper fuel to turn the light off.
If none of the above steps have made the light turn off, have your dealer or qualified service center check the vehicle. Your dealer has the proper test equipment and diagnostic tools to fix any mechanical or electrical problems that may have developed.
Return To Driver Information Center
The engine oil pressure gage shows the engine oil pressure in psi (pounds per square inch) or kPa (kilopascals) when the engine is running.
Oil pressure should be 20 to 80 psi (140 to 550 Wa). (In certain situations such as long, extended idles on hot days, it could read as low as 6 psi (40 kPa) and still be considered normal.) It may vary with engine speed, outside temperature and oil viscosity, but readings above the shaded area show the normal operating range. Readings in the shaded area tell you that the engine is low on oil, or that you might have some other oil problem. See "Engine Oil" in the Index.
The engine oil pressure can also be displayed using the GAGES button on the Driver Information Center (DIC). See "Driver Information Center" in the Index.
CAUTION
Don’t keep driving if the oil pressure is low. If you do, your engine can become so hot that it catches fire. You or others could be burned. Check your oil as soon as possible and have your vehicle serviced.
NOTICE:
Damage to your engine from neglected oil problems can be costly and is not covered by your warranty.
Return To Driver Information Center
This light comes on to remind you to arm your theft-deterrent system. If it comes on and stays on when your ignition is on, there may be a problem with your theft-deterrent system.
Return To Driver Information Center
This light will come on briefly when you are starting the engine. If the light comes on and stays on while you are driving, check your gages to see if they are in the warning areas.
This light can come on for the following reasons:
See "Universal Theft-Deterrent" and "PASS-Key System" in the Index.
Return To Driver Information Center
Your fuel gage shows about how-much fuel is in your tank.
When the needle approaches the, RESERVE FUEL will appear on the Driver Information Center (DIC) display. When the needle approaches the "E", LOW FUEL will appear on the display.
Press RESET to let the vehicle know that you have acknowledged a DIC message(s). Pressing RESET will also turn off a DIC message but the LOW FUEL message will come on again in’lO minutes if you have not added fuel to the vehicle.
Here are three concerns some owners have had about the fuel gage. All these situations are normal and do not indicate that anything is wrong with the fuel gage.
You can use the DIC to display more detailed fuel information. Each time you press FUEL, one of the following will appear in the DIC.
You should reset the fuel information display every time you refuel. To reset the display, press FUEL until AVERAGE appears. Then, press RESET on the DIC.
Return To Driver Information Center
Driver Information Center (DIC)
Return To Features and Controls
The Driver Information Center (DIC) will display information about how your vehicle is functioning, as well as warning messages if a system problem is detected. The DIC display area is located in the instrument cluster below the speedometer and tachometer, directly above the steering column.
The following buttons are on the DIC control panel which is located to the right of the cluster:
At the top of the DIC control buttons is a light sensor. Be sure not to block the sensor or your lighting functions may be disrupted.
Return To Driver Information Center
DIC Controls and Displays
Turn on the system by turning the ignition to ON. When you turn on the ignition, the DIC will be in the mode last displayed when the engine was turned off. Each DIC button allows you to scroll through a menu. A blank page ends each menu.
If a problem is detected, a diagnostic message will appear on the display. Press RESET to acknowledge any current warning or service messages. The following pages will show the messages you can see on the DIC display by pressing the DIC buttons.
The FUEL button displays average fuel economy and instantaneous fuel economy calculated for your specific driving conditions and range.
Press the FUEL button to display average fuel economy, such as:
The average fuel economy is viewed as a long-term approximation of your overall driving conditions. If you press RESET in this mode while you’re driving, the system will begin figuring fuel economy from that point in time. Press FUEL again to display instantaneous fuel economy, such as:
Press FUEL again to display the range, such as:
The range calculates the remaining distance you can drive without refueling. It's based on fuel economy and the fuel remaining in the tank.
If the range is lower than 30 miles (48 krn), the display will read RANGE LOW.
The fuel economy data used to determine fuel range is an average of recent driving conditions. As your driving conditions change, this data is gradually updated. Resetting the fuel range causes the fuel economy data to be updated immediately. Press RESET to reset the fuel range.
Return To Driver Information Center

Press the GAGE button to display the oil pressure, such as:
Press the GAGE button again to display the oil temperature, such as:
Press the GAGE button again to display the coolant temperature, such as:
Press the GAGE button again to display the transmission fluid temperature (automatics only), such as:
Press the GAGE button again to display the battery voltage, such as:
Press the GAGE button again to display the tire pressure for the front tires (left and right), such as:
Press the GAGE button again to display the tire pressure for the rear tires (left and right), such as:
Return To Driver Information Center
The TRIP button allows you to scroll through the functions listed below when you press it.
Return To Driver Information Center
The odometer shows how far your vehicle has been driven in either miles or kilometers. Press the TRIP button to display odometer readings such as:
Without the keys being in the ignition, you can also display the odometer by turning on the parking lamps.
Return To Driver Information Center
There are two trip odometers. Press the TRIP button and TRIP A will be displayed. Press it again and TRIP B will be displayed. TRIP A could be used to track the distance to a destination. TRIP B could be used to track maintenance periods.
The trip odometers can be reset by pushing the RESET button on the DIC. Both of the trip odometers can be used simultaneously.
Return To Driver Information Center
Miles Since Last Ignition Feature
You can also display number of miles driven since you last started the car if you press and hold the RESET button for two seconds, then release. The miles (or kilometers) since the last ignition cycle will be set into the trip odometer.
Return To Driver Information Center
Press the TRIP button until ELAP. TIME is displayed, such as ELM. TIME 00: 00 : 00.
When the ignition is in the ON position, the DIC can be used as a stopwatch. The display can show hours, minutes, seconds and hundredths of a second. The elapsed time indicator will record up to 99 hours, 59 minutes and 59 seconds, then it will reset to zero and continue counting. (Hundredths are shown up to 59 minutes, 59 seconds and 99 hundredths). The display appears as ELAP. TIME 00: 00 : 00 in the elapsed time function.
You can start or stop the elapsed time by pressing RESET. To reset the elapsed time to zero, stop the timer by pressing RESET. Then press and hold RESET for two seconds and release.
Return To Driver Information Center
Press the TRIP button until the average speed is displayed, such as:
Press reset in this mode to start calculating the average speed. Press and hold RESET to clear.
Return To Driver Information Center
Press the TRIP button until the engine oil life is displayed, such as OIL LIFE REMAIN 89%.
This is an estimate of the engine oil’s remaining useful life. It will show 99% when the system is reset after an oil change. It will alert you to change your oil on a schedule consistent with your driving conditions.
When the remaining oil life is low, the system will alert you with the message CHANGE OIL SOON.
When the oil life is down to zero, ‘you will receive the message CHANGE OIL NOW.
To reset the OIL LIFE reminder after an oil change:
Remember, you must reset the OIL LIFE yourself after each oil change. It will not reset itself. Also, be careful not to reset the OIL LIFE accidentally at any time other than when the oil has just been changed. It can’t be reset accurately until the next oil change.
The DIC does not replace the need to maintain your vehicle as recommended in the Maintenance Schedule in this manual. Also, the oil change reminder will not detect dusty conditions or engine malfunctions that may affect the oil. If you drive in dusty areas, change your oil after every 3,000 miles (5 000 km) or three months, whichever occurs first, unless the DIC instructs you to do so sooner. Also, the oil change reminder does not measure how much oil you have in your engine, so be sure to check your oil level often. See "Engine Oil" in the Index.
Return To Driver Information Center
This button allows you to choose personal options available with your vehicle, such as security, door locks, easy entry seats and language. Some of these functions work along with the key fob transmitter.
When returning to the options menu, the first, item of the options list will always be displayed, not the one you were last in when you changed buttons.
Return To Driver Information Center
The following are the options listed under the OPTIONS button:
Press the OPTIONS button until LOCK & ARM appears on the display, then use the RESET button to page through the following selections:
If you choose LOCK & ARM OFF, you will receive no security feedback when locking or unlocking your vehicle.
If you choose LOCK & ARM HORN ONLY, only the horn will chirp to let you know when your alarm system has armed when locking your vehicle.
If you choose LOCK & ARM LIGHTS, only your exterior lamps will flash to let you know when your alarm system has armed when locking your vehicle.
If you choose LOCK & ARM HORN & LTS, the horn will chirp and the exterior lamps will flash briefly to let you know the system has armed when locking your vehicle.
Return To Driver Information Center
Press the OPTIONS button until ALARM appears on the display, then use the RESET button to page through the following selections:
If you choose ALARM HORN, the horn will sound during an alarm. If you choose ALARM HORN & LIGHTS, the horn will sound and the interior and exterior lamps will flash during an alarm.
Return To Driver Information Center
Press the OPTIONS button until PASSIVE UNLOCK appears on the display, then use the RESET button to page through the following selections:
If you choose the PASSIVE UNLOCK- DRIVER, only the driver’s door lock will be programmed to passively unlock. The driver’s door will passively unlock when you approach the vehicle with the key fob transmitter slider switch set to ON.
If you choose PASSIVE UNLOCK- BOTH, the driver and passenger’s door locks will be programmed to passively unlock. The driver and passenger doors will passively unlock when you approach the vehicle with the key fob transmitter slider switch set to ON.
See "Remote Function Actuation (FWA) System" in the Index for more information.
Return To Driver Information Center
Press the OPTIONS button until APPROACH LIGHTS appears on the display, then use the RESET button to page through the following choices:
If you choose APPROACH LIGHTS ON, the fog lamps, front turn signal, rear back-up and courtesy lamps will come on for 30 seconds as you approach the vehicle with the key fob transmitter. This will occur only when it is dark outside.
APPROACH LIGHTS OFF turns off this option.
See "Remote Function Actuation (RFA) System" in the Index for more information.
Return To Driver Information Center
Press the OPTIONS button until AUTO LOCK appears on the display, then use the RESET button to page through the following choices:
If you choose AUTO LOCK ON, both doors will automatically lock when the vehicle exceeds 10 mph (16 ktnh) in a manual transmission. In a vehicle with an automatic transmission, both doors will automatically lock when you move the shifter out of PARK (P).
Choose AUTO LOCK OFF to turn this option off.
Return To Driver Information Center
The AUTO UNLOCK will be available only if AUTO LOCK is set to ON.
Press the OPTIONS button until AUTO UNLOCK appears on the display, then use the RESET button to page through the following choices:
If you choose AUTO UNLOCK- DRIVER, the driver’s door will automatically unlock when you turn the vehicle off and pull the key out of the ignition.
Choose AUTO UNLOCK - BOTH, and both doors will automatically unlock when you turn the vehicle off and pull the key out of the ignition.
AUTO UNLOCK OFF turns off this option.
Return To Driver Information Center
The easy entry feature will only be available if the vehicle is equipped with the memory option. Press the OPTIONS button until SEAT EASY ENTRY appears on the display, then use the RESET button to page through the following choices:
If you choose SEAT EASY ENTRY ON, when you turn the ignition off and remove the key, the seat will automatically move back for an easy exit or an easy entrance when returning to the vehicle.
SEAT EASY ENTRY OFF turns off this option.
Return To Driver Information Center
You can select which language the DIC will display its messages in. Press the OPTIONS button until the word LANGUAGES appears on the display, then use the RESET button to page through the following choices:
Return To Driver Information Center
There is a blank page at the end of the OPTIONS menu. When the blank page is displayed, you can access thefollowing items:
Return To Driver Information Center
Return To Driver Information Center
The following messages and warnings may appear in the DIC display. The DIC display area is located in the instrument cluster below the speedometer and tachometer, directly above the steering column. You may receive more than one message at a time. Messages will appear one behind the other. To acknowledge a message and remove it from the display, press RESET. You may scroll through the messages that may have been sent at the same time. The message center is continuously updated with the vehicleperformance status.
Return To Driver Information Center
ABS ACTIVE (Anti-Lock Brake System Active)
When your anti-lock system is adjusting brake pressure to help avoid a braking skid, the ABS ACTIVE message
will be displayed.
Slippery road conditions may exist if this message is displayed, so adjust your driving accordingly. The message will stay on for a few seconds after the system stops adjusting brake pressure.
Return To Driver Information Center
SERVICE ABS (Anti-Lock Brake System)
If the SERVICE ABS message is displayed when you are driving, stop as soon as possible and turn the ignition off. Then start the engine again to reset the system. If the message stays on, or comes back on again while you are driving, your vehicle is in need of service. If the regular brake system warning light isn’t on, you still have brakes, but don’t have anti-lock brakes. If the regular brake system light is also on, you don’t have anti-lock brakes and there is a problem with your brakes. See "Brake System Warning Light" earlier in this section.
If the SERVICE ABS message is being displayed, your traction control system and the optional active handling system will also be disabled. The driver information center will scroll three messages SERVICE ABS, SERVICE TRACTION SYS. and SERVICE ACTIVE HNDLG and the instrument cluster car icon will be illuminated. The driver can acknowledge these messages by pressing the reset button three times. When the service message is displayed the computer controlled systems will not assist the driver and you should have the system repaired as soon as possible. Adjust your driving accordingly.
Return To Driver Information Center
The system that controls the locking and unlocking of the steering column may not work properly. Have the vehicle towed to a dealer for service.
Return To Driver Information Center
You will hear four chimes and the CHECK GAGES telltale will come on when this message is displayed. To acknowledge the warning, press the RESET button. After you press the RESET button, a message will be displayed and you will hear a chime every minute until the vehicle is serviced. If you do not press RESET, the message will remain on the digital display until the vehicle is serviced.
Low oil pressure may be the result of a combination of low oil level and abrupt changes in the vehicle’s direction. When this warning is displayed, you should not operate the engine at high RPM or make fast abrupt moves. When convenient, you should check the oil level. See "Engine Oil" in the Index.
Return To Driver Information Center
Press RESET to acknowledge that you have read the message and to remove it from the display. The message will reappear every 10 minutes until this condition changes.
You will hear two chimes when this message is displayed. If this message appears after starting your engine, your engine oil level may be too low. You may need to add oil. See "Engine Overheating" in the Index.
Return To Driver Information Center
You will hear chimes continuously when this message is displayed. To acknowledge that you have read the message and to remove it from the display, press RESET. The message will reappear every 15 seconds until this condition changes.
If the Driver Information Center displays the REDUCED ENGINE POWER message and the CHECK ENGINE light comes on, a noticeable reduction in the vehicle’s performance may occur. If the REDUCED ENGINE POWER message is displayed but there is no reduction in performance, proceed to your destination. The performance may be reduced the next time the vehicle is driven.
The vehicle may be driven at a reduced speed while the REDUCED ENGINE POWER message is displayed, but acceleration and speed may be reduced. Anytime the CHECK ENGINE light stays on, the vehicle should be taken to an authorized Chevrolet dealer as soon as possible for diagnosis and repair.
Also, refer to "Malfunction Indicator Lamp" (Check Engine Light) in the Index. If the REDUCED ENGINE POWER message is displayed in combination with the COOLANT OVER TEMP message, see "Engine Overheating" in the Index.
Return To Driver Information Center
If this message appears on the DIC, there may be an electrical or another system problem with your vehicle. Have your vehicle checked by your dealer if this message keeps appearing.
Return To Driver Information Center
Press RESET to acknowledge that you have read the message and to remove it from the display. The message will reappear every 10 minutes until this condition changes. You will hear two chimes when this message is displayed.
If this message comes on while you are driving, you may have a problem with the electrical charging system. It could indicate that you have a loose or broken drive belt or another electrical problem. Have it checked right away. Driving while this light is on could drain your battery.
If you must drive a short distance with the message on, be certain to turn off your accessories, such as the radio and air conditioner.
Return To Driver Information Center
When your traction control system is limiting wheel spin, the TRACTION SYS ACTIVE message will be displayed. Slippery road conditions may exist if this message is displayed, so adjust your driving accordingly. The message will stay on for a few seconds after the traction control system stops limiting wheel spin.
Return To Driver Information Center
This message is displayed when you decide to turn on the TCS by pressing the switch on the console. This message will shut off automatically on its own.
Return To Driver Information Center
You will hear a single quick tone when this message is displayed. This message comes on and stays on when the TCS button on the console is pressed to turn the system off. To acknowledge this message, press RESET.
Return To Driver Information Center
If the SERVICE TRACTION SYS message is displayed when you are driving, there is a problem with your Traction Control System and your vehicle is in need of service. When this message is displayed, the system will not limit wheel spin. Adjust your driving accordingly.
If you have the optional Active Handling System, the SERVICE ACTIVE HNDLG message will also be displayed and the instrument cluster car icon will also be illuminated. The driver can acknowledge both messages by pressing the reset button two times which will also turn off the instrument cluster icon. When the service messages are displayed, the computer controlled systems will not assist the driver in controlling the vehicle. Have the system repaired as soon as possible. Adjust your driving accordingly.
Return To Driver Information Center
This message is used to indicate to the driver that the Selective Real Time Damping (SRTD) system has detected a malfunction and that the system must be serviced. The SERVICE RIDE CONTROL message will always come on when a failure is detected by the Selective Real Time Damping system. If a fault is present in the SRTD which causes the shocks to be in their full soft condition, the SERVICE RIDE CONTROL, SHOCKS INOPERATIVE and MAXIMUM 80 MPH (129 km/h) will display together. You will never get a SHOCKS INOPERATIVE and MAXIMUM SPEED 80 MPH (129 km/h) message without a SERVICE RIDE CONTROL message.
Return To Driver Information Center
You will hear four chimes when this message is displayed. To acknowledge that you have read the message and to remove it from the display, press RESET. The message will reappear every 10 minutes until this condition changes. This message indicates that a malfunction is present in the Selective Real Time Damping system which is causing the shocks to be in their full soft mode. This is a warning to the driver that the vehicle handling may be affected. Have your vehicle serviced as soon as possible.
Return To Driver Information Center
MAXIMUM SPEED 80 MPH (129 km/h):
You will hear four chimes when this message is displayed. To acknowledge the warning, press RESET. After you press RESET, a message will reappear every 10 minutes until this condition changes.
This message indicates that the vehicle speed will be limited to 80 mph (129 km/h) when the shock absorber system has failed and the shocks are in their full soft mode. Have your vehicle serviced as soon as possible.
Return To Driver Information Center
You will hear two chimes when this message is displayed. To acknowledge the warning, press RESET. After you press RESET, a message will reappear and you will hear a chime every 10 minutes until this condition changes.
This message indicates that the coolant in the system is low. You may need to add coolant. See "Engine Overheating" in the Index.
Return To Driver Information Center
You will hear four chimes and the CHECK GAGES telltale will come on when this message is displayed. To acknowledge the warning, press the RESET button. After you press the RESET button, a message will be displayed and you will hear a chime every minute until this condition changes. If you do not press RESET, the message will remain on the digital display until the condition changes.
If the engine coolant exceeds 255 "F (124"C), this message is displayed. If you have been operating your vehicle under normal driving conditions, you should pull off from the road, stop your vehicle and turn off the engine as soon as possible. You can monitor the coolant temperature with the GAGES button on the DIC or the engine coolant gage on the instrument panel cluster. See "Engine Overheating" in the Index.
Return To Driver Information Center
HIGH OIL TEMPERATURE REDUCE ENGINE RPM:
You will hear four chimes when this message is displayed. To acknowledge the warning, press the RESET button. After you press the RESET button, a message will be displayed and you will hear a chime every minute until this condition changes. If you do not press RESET, the message will remain on the digital display until the condition changes.
If the engine oil temperature exceeds 320°F (1 60" C), this message is displayed. You should check the engine coolant temperature and engine oil level. If your engine is too hot, see "Engine Overheating’’ in the Index. Your vehicle may need service, so see your dealer. You can monitor the oil temperature with the GAGES button on the DIC.
Return To Driver Information Center
HIGH TRANS TEMP: You will hear four chimes when this message is displayed. To acknowledge this warning, press the RESET button. After you press the RESET button, the message will be displayed every 10 minutes until the condition changes. If you do not press RESET, the message remains on the display until the condition changes.
If the transmission fluid temperature rises above 263°F (128°C) or rises rapidly, this message is displayed. The transmission may shift gears or apply the torque converter clutch to reduce the fluid temperature. Driving aggressively or driving on long hills can cause the transmission fluid temperature to be higher than normal. If this message appears, you may continue to drive at a slower speed. You should also monitor the transmission fluid temperature and allow it to cool to at least 230°F (1 10°C). The transmission fluid temperature can be monitored with the GAGES button on the DIC. See "Automatic Transmission Fluid" in the Index. You should also check the engine coolant temperature. If it is also hot, see "Engine Overheating" in the Index.
If the HIGH TRANS TEMP message is displayed during normal vehicle operation on flat roads, your vehicle may need service. See your dealer for an inspection.
Return To Driver Information Center
LOW TIRE PRESSURE - (LF, LR, RF, RR):
YOU will hear two chimes when this message is displayed. To acknowledge the warning, press RESET. After you press RESET, a message will reappear and you will hear a chime every 10 minutes until this condition changes. This message indicates that the pressure in one of your tires is less than 25 psi (172 E a ). Next to the LOW TIRE PRESSURE message, you can see either LF (left front), LR (left rear), RF (right front) or RR (right rear) to indicate to you which tire is low on pressure. You can receive more than one tire pressure message at a time. To read other messages that may have been sent at the same time, press RESET. If a tire pressure message appears on the DIC, stop as soon as you can. Have the tire pressures checked and set to those shown on your Tire Loading Information Label. See "Extended Mobility Tires" in the Index.
CAUTION
When the LOW TIRE PRESSURE or FLAT TIRE message is displayed on the Driver Information Center, your vehicle’s handling capabilities will be reduced during severe maneuvers. If you drive too fast, you could lose control of your vehicle. You or others could be injured. Don’t drive over 55 mph (90 km/h) when the LOW TIRE PRESSURE or FLAT TIRE message is displayed. Drive cautiously, and check your tire pressures as soon as you can.
Return To Driver Information Center
FLAT TIRE - (LF, LR, RF, RR):
You will hear two chimes when this message is displayed followed by the message MAX SPEED 55 MPH (90 km/h). If this message appears, do not drive your vehicle above these limits. The next message to appear is REDUCED HANDLING. Adjust your driving accordingly. To acknowledge these warnings, press RESET. After you press RESET, a message will reappear and you will hear a chime every 10 minutes until this condition changes. This message indicates that the pressure in one of your tires is lower than 5 psi (34 Wa). Next to the FLAT TIRE message, you can see either LF (left front), LR (left rear), RF (right front) or RR (right rear) to indicate to you which tire is flat. You can receive more than one tire pressure message at a time. To read other messages that may have been sent at the same time, press RESET. If a tire pressure message appears on the DIC, stop as soon as you can. Have the tire pressures checked and set to those shown on your Tire Loading Information Label. See "Extended Mobility Tires" and "Tire Inflation" in the Index.
When the LOW TIRE PRESSURE or FLAT TIRE message is displayed on the Driver Information Center, your vehicle’s handling capabilities will be reduced during severe maneuvers. If you drive too fast, you could lose control of your vehicle. You or others could be injured. Don’t drive over 55 mph (90 kmh) when the LOW TIRE PRESSURE or FLAT TIRE message is displayed. Drive cautiously, and check your tire pressures as soon as you can.
Return To Driver Information Center
HIGH TIRE PRESSURE - (LF, LR, RF, RR):
YOU will hear two chimes when this message is displayed. To acknowledge the warning, press RESET. After you press RESET, a message will reappear and you will hear a chime every 10 minutes until this condition changes. This message indicates that the pressure in one of your tires is higher than 42 psi (290 P a ). Next to the HIGH TIRE PRESSURE message, you can see either LF (left front), LR (left rear), RF (right front) or RR (right rear) to indicate to you which tire is higher than 42 psi (290 Wa). You can receive more than one tire pressure message at a time. To read other messages that may have been sent at the same time, press RESET. If a tire pressure message appears on the DX, stop as soon as you can. Have the tire pressures checked and set to those shown on your Tire Loading Information Label. See "Extended Mobility Tires" and "Tire Inflation" in the Index.
Return To Driver Information Center
If this message comes on, a part on the Tire Pressure Monitor (TPM) is not working properly. If you drive your vehicle while any of the four sensors are missing or operable, the warning will come on in approximately 10 minutes. If all four sensors are missing, the warning will come on in approximately 15 to 20 minutes. (All the sensors would be missing, for example, if you put different wheels on your vehicle without transferring the sensors.) If the warning comes on and stays on, there may be a problem with the TPM. See your dealer.
Return To Driver Information Center
Here are more messages that you can receive on your Driver Information Center. To acknowledge a message and read another message that may have come on at the same time, press the RESET button.
Return To Driver Information Center
2-106
. ..
2-1
1-2
Seats and Seat Controls Power Seat
This part tells you about the seats -- how to adjust them,
and also about reclining seatbacks and seatback latches.
Manual Front Seat (Option, Passenger Only)
Pull up on the lever in front of the seat to unlock it.
Slide the seat to where you want it. Then release the
lever and try to move the seat with your body to make
sure the seat is locked into place.
The switch for the power seats is located on the side of
each seat, near the base.
Different parts of the power seat control move different
parts of your seat. If you move the whole control, the
whole seat will move. The back of the control will raise
or lower the back of the seat, and the front of the control
will raise or lower the front of the seat.
Move the control to the front or to the back to move the
seat forward or backward. Move the control up to raise
the seat and down to lower it.
Your preferred seat position can be stored and recalled if
you have the memory option. See "Memory" in the Index.
A / B / C / D / E / F / G / H / I / J / K / L / M / N / O / P / R / S / T / U / V / W
9-10