Comfort Controls and Audio Systems
In this section, you’ll find out how to operate the comfort control and audio
systems offered with your vehicle. Be sure to read about the particular systems
supplied with your vehicle.
This section tells you how to make your air system work for you. Your comfort control system uses ozone-friendly R- 134a refrigerant.
With these systems, you can control the heating, cooling and ventilation in your vehicle. Your vehicle also has a flow-through ventilation system described later in this section.
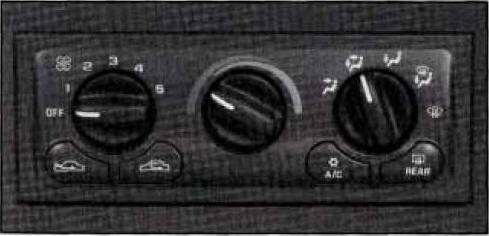
The left knob is the fan knob and selects the force of air
you want. Turn the knob to the right to increase fan speed and to the left to
decrease fan speed. The fan must be
turned on for the air conditioning compressor to operate.
The center knob controls the temperature of the air coming through the system. Turn it to the left (toward the blue area) for cooler air. Turn it to the right (toward the red area) for warmer air.
The right knob selects the direction of where the air will enter the vehicle.
![]() UPPER: This
setting directs most of the air through the instrument panel outlets with a very
small amount of air directed to the lower outlets.
UPPER: This
setting directs most of the air through the instrument panel outlets with a very
small amount of air directed to the lower outlets.
![]() BI-LEVEL: This
setting directs air into your vehicle in two ways. Cooler air is directed toward
your upper body through the instrument panel outlets, while warmer air is
directed through the lower outlets.
BI-LEVEL: This
setting directs air into your vehicle in two ways. Cooler air is directed toward
your upper body through the instrument panel outlets, while warmer air is
directed through the lower outlets.
![]() LOWER: This
setting directs most of the air through the lower ducts to the floor area of the
vehicle with some of the air also directed toward the windshield
LOWER: This
setting directs most of the air through the lower ducts to the floor area of the
vehicle with some of the air also directed toward the windshield
and side window vents.
![]() DEFOG: This
setting divides the air between the windshield and lower outlets with a small
amount directed toward the side window vents. This is useful when fog appears on
the windshield or side glass due to rain or snowy conditions.
DEFOG: This
setting divides the air between the windshield and lower outlets with a small
amount directed toward the side window vents. This is useful when fog appears on
the windshield or side glass due to rain or snowy conditions.
![]() DEFROST
Use this
setting to quickly remove fog or frost from the windshield. This setting directs
most of the airflow to the windshield with a small amount directed toward the
lower and side window outlets.
DEFROST
Use this
setting to quickly remove fog or frost from the windshield. This setting directs
most of the airflow to the windshield with a small amount directed toward the
lower and side window outlets.
Mode Buttons
These buttons control the air intake, the air conditioning
and the rear window defogger operation.
![]() FRESH AIR: Press
this button and it will bring outside air into your vehicle. The light on the
button will come on when operating. Use this setting while trying to defrost or
defog windows to help clear moisture.
FRESH AIR: Press
this button and it will bring outside air into your vehicle. The light on the
button will come on when operating. Use this setting while trying to defrost or
defog windows to help clear moisture.
![]() RECIRCULATE :
Press this button to limit the amount of fresh air entering your vehicle by
recirculating most of the air inside your vehicle. The light on the button
will come on when operating. This setting is helpful when you are trying to cool
the air quickly or to limit odors entering your vehicle. RECIRCULATE cannot be
used while in the DEFROST or DEFOG modes.
RECIRCULATE :
Press this button to limit the amount of fresh air entering your vehicle by
recirculating most of the air inside your vehicle. The light on the button
will come on when operating. This setting is helpful when you are trying to cool
the air quickly or to limit odors entering your vehicle. RECIRCULATE cannot be
used while in the DEFROST or DEFOG modes.
![]() A/C: This button
turns the air conditioning compressor off or on under most conditions. The light
on the A/C button comes on when the compressor is operating. The air
conditioning does not operate at temperatures below approximately 35 O F to 40°F
(2" C to 4°C). The air conditioning cools and dehumidifies the air coming into
the vehicle. The air conditioning cannot be turned off in DEFROST as it helps to
remove
A/C: This button
turns the air conditioning compressor off or on under most conditions. The light
on the A/C button comes on when the compressor is operating. The air
conditioning does not operate at temperatures below approximately 35 O F to 40°F
(2" C to 4°C). The air conditioning cools and dehumidifies the air coming into
the vehicle. The air conditioning cannot be turned off in DEFROST as it helps to
remove
moisture from the vehicle. I t also helps to keep the windows clear.
The air conditioning may be forced off at high engine
speeds or high engine oil or coolant temperatures.
3-3
Automatic Electronic Dual Climate Control System (If Equipped)
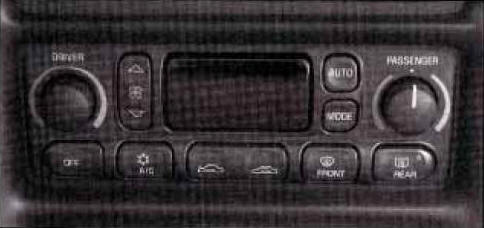
Your vehicle may be equipped with a Dual Zone Electronic
Climate Control System. This system can automatically adjust and control
temperature output, fan speed, air delivery mode, air conditioning operation and
air intake. You can use the AUTO (automatic) setting or override the automatic
operation with manual control settings. The control settings will be remembered
each time you turn the ignition off and restart in the same
settings. You can use the Memory option to store and recall your settings. (See
“Memory” in the Index.)
Digital Display
The digital display shows readings in Fahrenheit or Celsius by pressing the E/M
button (English/Metric) on the Driver Information Center DIC). When you start
the vehicle, the display will show the current fan speed, air delivery mode and
the driver-set temperature for approximately five seconds and then show the
outside temperature.
When the system is fully in the automatic mode, the word AUTO will also appear on the display. If you have selected a manual fan speed, then the fan symbol will appear on the display. If a manual air delivery mode has been selected, the delivery mode symbol will appear on the display.
Driver Set Temperature Knob
The DRIVER knob changes the temperature on the driver’s and passenger’s side of
the vehicle. Turn the knob to the right to increase the temperature and to the
left to decrease the temperature. Whenever you turn this knob, the temperature
will be displayed for approximately five seconds along with the current fan
speed and air delivery mode.
3-4
When adjusting the temperature, start with a driver-set temperature of 73°F (23 "C) until you determine your comfort zone. If you choose 60°F (16"C), the system will remain at maximum cooling and will not automatically adjust fan speed or air delivery. If you choose 90°F (32"C), the system will remain at maximum heating and will not automatically adjust fan speed or air delivery. Choosing either maximum setting will not cause the system to heat or cool any faster. Turning the knob past either maximum setting has no effect on the operation of the system.
Passenger Temperature Offset
The PASSENGER knob changes the temperature on the passenger's side of the
vehicle. When the knob is in the 12 o'clock position, the passenger's
temperature is the
same as the driver's. Turn the knob to the right for warmer air on the
passenger's side, to the left for cooler air. If the driver-set temperature is
set at 60°F (1 6 " C) or 90 O F (32 " C), turning the passenger knob has no
effect because the system is locked at a maximum setting.
Automatic Operation
Press the AUTO button to place the entire system in the automatic mode. After a
five second display of the current settings, only the word AUTO and the outside
temperature will be shown on the digital display. The system will operate to
achieve your comfort set
temperature as quickly as possible. If you have set the driver temperature at
60°F (16°C) or 90°F (32"C), the system will not operate automatically until a
different temperature is selected. The AUTO control system works best with the
windows up and the removable roof installed or the convertible top up.
A Typical Cold Weather Example:
Your vehicle has been parked outside overnight in cold weather (below 32 O F / 0
" C) and you have set the driver temperature at 73°F (23°C) and have selected
the AUTO
mode. The system will automatically adjust the temperature output to maximum
heatingT. he fan will start at a low speed. This is to avoid blowing cold air
into the vehicle. The length of the delay depends on the amount of time since
the engine was last started, the outside temperature and the engine coolant
temperature. As the coolant warms up, the fan speed will gradually increase. Air
will flow to the floor with some air to the windshield
to prevent fogging under most normal conditions.
3-5
As the interior of the vehicle warms up to your comfort set temperature, the fan speed will decrease and the temperature output may become cooler. If the interior temperature continues to warm up due to heating from the sun or outside temperature increases, the system may switch to other air delivery modes (typically DEFOG or BI-LEVEL).
A Typical Hot Weather Example:
Your vehicle has been parked outside all day in hot weather (above 70 F/ 21 C)
and you have set the driver temperature at 73 F ( 23 C) and have selected
the AUTO mode. The system will automatically adjust the temperature output to
maximum cooling. The blower
will start at a low speed momentarily to push the hot air to the floor of the
vehicle and then go to a higher blower speed with cold airflow out of the
instrument panel outlets. A small amount of airflow will continue through the
lower ducts to cool the floor area.
The air intake may start in the recirculated mode for
maximum cooling performance. As the interior of the vehicle cools down to your
comfort set temperature, the fan speed will decrease and the temperature output
may become warmer. The air intake may shift from
recirculation to fresh air mode. If the interior continues to cool due to
a decrease in the amount of heat at the vehicle is absorbing from the sun or a
decrease in the outside temperature, the system could switch to other air
delivery modes (typically BI-LEVEL or DEFOG).
Manual Settings
With the Dual Zone Electronic Climate Control, there are several manual settings
you can use to control the system and override the AUTO operation. You can
program the fan speed air delivery mode, air intake mode and control the air
conditioning operation using these settings. The system will still determine the
temperature output level based on the driver-set temperature and the passenger
temperature offset.
![]() FAN SPEED: Press
the button with the fan switch on it to manually lock in the current fan speed
and to stop the automatic fan speed control. Pressing the arrows will delete
AUTO from the digital display. The fan graphics with the fan speed bars will be
shown. To increase the fan speed so that more air flows into the vehicle, press
the UP arrow on the fan switch. To decrease the fan speed and airflow, press the
DOWN arrow. The AUTO button must be pressed to return to the automatic fan
control.
FAN SPEED: Press
the button with the fan switch on it to manually lock in the current fan speed
and to stop the automatic fan speed control. Pressing the arrows will delete
AUTO from the digital display. The fan graphics with the fan speed bars will be
shown. To increase the fan speed so that more air flows into the vehicle, press
the UP arrow on the fan switch. To decrease the fan speed and airflow, press the
DOWN arrow. The AUTO button must be pressed to return to the automatic fan
control.
3-6
MODE: Press the MODE button to manually lock in the current air delivery setting and to stop the automatic mode control. Pressing the MODE button will delete AUTO from the digital display and the mode graphics will be shown. To change the setting, press the MODE button again. The AUTO button must be pressed to return to the automatic mode selection.
![]() UPPER: This setting directs most
of the air
through the instrument panel outlets and a very small
amount to the lower outlets.
UPPER: This setting directs most
of the air
through the instrument panel outlets and a very small
amount to the lower outlets.
![]() BI-LEVEL: This setting directs air into your
vehicle in two ways. Cooler air is directed toward your
BI-LEVEL: This setting directs air into your
vehicle in two ways. Cooler air is directed toward your
upper body through the instrument panel outlets, while
warmer air is directed through the lower outlets.
![]() LOWER: This setting directs most
of the air to
the floor area and some of it toward the windshield and
side window vents.
LOWER: This setting directs most
of the air to
the floor area and some of it toward the windshield and
side window vents.
![]() DEFOG: This setting divides the air between
the windshield and lower outlets and a small amount
DEFOG: This setting divides the air between
the windshield and lower outlets and a small amount
toward the side window vents. This is useful when fog
appears on the windshield or side glass due to rain or
snowy conditions.
Mode Buttons
These buttons control climate control ON/OFF, air
intake, front defrost, rear defrost and the air
conditioning operation.
OFF: Press the OFF button to turn off the climate control system. This is the only setting that fully shuts off the fan. The digital display will show only the outside temperature. You can still adjust he driver set temperature, the passenger temperature offset and the air intake mode while in OFF.
![]() A/C: This button turns the air conditioning
compressor on or off, except in the FRONT defrost
mode. The light on the A/C button will come on when
the compressor is operating in either the automatic or
manual mode. The air conditioning may also be forced
off at high engine speeds. The light on the A/C button
will flash if pressed when air conditioning operation is
not allowed.
A/C: This button turns the air conditioning
compressor on or off, except in the FRONT defrost
mode. The light on the A/C button will come on when
the compressor is operating in either the automatic or
manual mode. The air conditioning may also be forced
off at high engine speeds. The light on the A/C button
will flash if pressed when air conditioning operation is
not allowed.
3-7
![]() FRESH AIR: Press this button to provide fresh air from the outside. The light on this air intake button
will come on to show when it is operating. When in the
AUTO mode, the system automatically selects FRESH
AIR instead of RECIRCULATE, as required, to control
the temperature in the vehicle. By pressing FRESH
AIR, the system will lock into the fresh air mode. Any
adjustment to the air intake must then be made
manually. FRESH AIR should be used when trying to
defrost or defog windows to help reduce moisture inside
the vehicle.
FRESH AIR: Press this button to provide fresh air from the outside. The light on this air intake button
will come on to show when it is operating. When in the
AUTO mode, the system automatically selects FRESH
AIR instead of RECIRCULATE, as required, to control
the temperature in the vehicle. By pressing FRESH
AIR, the system will lock into the fresh air mode. Any
adjustment to the air intake must then be made
manually. FRESH AIR should be used when trying to
defrost or defog windows to help reduce moisture inside
the vehicle.
![]() RECIRCULATE: Press this button to limit the amount of fresh air entering the vehicle. The light on
this air intake button will come on to show when it is
operating. RECIRCULATE is helpful when you are
trying to cool the air quickly or trying to limit odors and
dust from entering the vehicle. When in the AUTO
mode, the system automatically selects RECIRCULATE
to cool the vehicle’s temperature. By pressing this
button, the system will lock into the recirculated air
mode. Any adjustment to the air intake must then be
made manually. The recirculated air mode is not allowed
in the front defrost or defog modes as fresh air helps
reduce moisture inside the vehicle.
RECIRCULATE: Press this button to limit the amount of fresh air entering the vehicle. The light on
this air intake button will come on to show when it is
operating. RECIRCULATE is helpful when you are
trying to cool the air quickly or trying to limit odors and
dust from entering the vehicle. When in the AUTO
mode, the system automatically selects RECIRCULATE
to cool the vehicle’s temperature. By pressing this
button, the system will lock into the recirculated air
mode. Any adjustment to the air intake must then be
made manually. The recirculated air mode is not allowed
in the front defrost or defog modes as fresh air helps
reduce moisture inside the vehicle.
![]() FRONT: Press the FRONT defrost button to
quickly remove fog or frost from the windshield. This
setting directs most of the airflow to the windshield and
a small amount toward the lower and side window
outlets. The light on the button will come on and the digital display will show the defrost mode symbol and
fan speed when the front defrost mode is being used.
Pressing FRONT defrost again will return the system to
the last operating mode.
FRONT: Press the FRONT defrost button to
quickly remove fog or frost from the windshield. This
setting directs most of the airflow to the windshield and
a small amount toward the lower and side window
outlets. The light on the button will come on and the digital display will show the defrost mode symbol and
fan speed when the front defrost mode is being used.
Pressing FRONT defrost again will return the system to
the last operating mode.
If the system is in FRONT defrost when you shut the engine off, it will restart in FRONT defrost unless the engine is off for longer than 40 minutes. If the engine is off longer than 40 minutes, the system will restart in the operating mode you had set prior to FRONT defrost.
The air conditioning cools and dehumidifies air coming
into the vehicle. It also operates in defrost to help
remove moisture from the vehicle. The air conditioning
does not operate at temperatures below approximately
35°F to 40°F (2°C to 4°C). If the system is operating in
the AUTO mode, turning the air conditioning off will
delete AUTO from the digital display and show current
mode and fan settings. The AUTO button must be
pressed to return to the automatic mode operation.
3-8
Sensors
The Dual Zone Electronic Climate Control System
uses several sensors to control operation and
display information.
Solar Load Sensor
This sensor is located on the top right side of the
defroster grille. The defroster grille is on the top of the
instrument panel.
The sensor monitors the sun’s solar radiation and uses this information asp art of the automatic climate control system when operating in the AUTO mode.
Be careful not to put anything over the sensor. It cannot compensate for changes in the amount of heat the vehicle is absorbing from the sun when covered.
Outside Air Temperature Sensor
This sensor is located in the air intake under the front
bumper of the vehicle. Information from this sensor
is used for the outside air temperature readings
shown on the digital display for the automatic climate
control system.
If the outside temperature goes up, the displayed temperature will not change until:
These delays help prevent false reading. If the temperature goes down, the outside temperature display is updated immediately.
If your vehicle has been turned off for more than three hours, the current outside temperature will be shown when you start the vehicle. If it has been turned off for less than three hours, the temperature will be recalled from the previous vehicle operation.
Inside Temperature Sensor
This sensor is located just left of the ignition switch.
The automatic climate control system uses the sensor
to receive information so if you block or cover it, the
system will not function properly.
3-9
Air Conditioning
On very hot days, your vehicle will cool down more
quickly and economically if you open the windows long
enough to let hot inside air escape. Then keep your
windows closed in order to allow the air conditioning to
work best. Maximum cooling will occur when the
RECIRCULATE setting is operating, airflow direction is
in the upper mode, and the temperature control knob (on
a manual climate control system) is turned all the way to
the blue area. These settings will be selected by the
Automatic Electronic Dual Climate Control System if
operating in AUTO when maximum cooling is required.
When the air conditioning is on, you may sometimes notice slight changes in your vehicle’s engine performance and power. This is normal. The system is designed to .help fuel economy while maintaining the desired cooling level.
The air conditioning removes moisture from the air, so you
may notice water dripping from under your vehicle when
it is idling or after it has been turned off. This is normal.
Heating
The heater works best if you keep your windows closed.
Maximum heating will occur when airflow direction is
in the lower mode and the temperature control knob (on
a manual climate control system) is all the way in the
red area. These settings will be selected by the
Automatic Electronic Dual Climate Control System if
operating in AUTO when maximum heating is required.
The BI-LEVEL setting is designed for use on sunny days when the air is only moderately warm or cool. On days like these, the sun may adequately warm your upper body, but your lower body may not be warm enough. The BI-LEVEL setting will direct cooler airflow y to your upper body and warmer air to the floor area.
If you have the optional engine coolant heater and use it
during cold weather 0°F (- 18 “C) or lower, your heating
system will provide heat more quickly because the
coolant is already warmed. See “Engine Coolant Heater”
3-10
![]() Rear Window Defogger
Rear Window Defogger
This button turns the rear defogger and heated
outside mirrors on. The light on the button will come
on when operating. The system automatically shuts off
after approximately 10 minutes. If further defogging is
desired, press the button again.
The rear window defogger operates only when the engine is running.
The rear window defogger uses a warming grid to remove fog from the rear window. Do not attach anything like a temporary vehicle license or a decal across the defogger grid on the rear window.
NOTICE:
Don’t use a razor blade or something sharp on
the inside of the rear window. If you do, you
could cut or damage the warming grid, and
repairs wouldn’t be covered by your warranty.
Defogging and Defrosting
To rapidly defrost the windshield, the FRONT defrost
mode (electronic dual climate control system) or defrost
mode (manual control system) should be used and the
fan speed should be adjusted to the highest speed. With
the manual control system, turn the temperature control
knob all the way to the red area.
To keep the windshield clear and provide heated air to the floor area of the vehicle, use the DEFOG setting.
Your vehicle is equipped with side window defogger vents located near the side rearview mirrors.
Ventilation System
Your vehicle’s flow-through ventilation system supplies
outside air into the vehicle when it is moving. Outside
air will also enter the vehicle when the fan is running.
Ventilation Tips
0 Keep the hood and front air inlet free of ice, snow or
any other obstruction (such as leaves). The heater
and defroster will work far better, reducing the
chance of fogging the inside of the windows.
3-11
Audio Systems
Your Delco Electronics audio system has been designed
to operate easily and give years of listening pleasure.
You will get the most enjoyment out of it if you acquaint
yourself with it first. Find out what your Delco
Electronics system can do and how to operate all its
controls, to be sure you're getting the most out of the
advanced engineering that went into it.
Setting the Clock for All Systems
Press and hold HR until the correct hour appears. Press
and hold MN until the correct minute appears.
AM-FM Stereo with Cassette Tape Player
and Automatic Tone Control
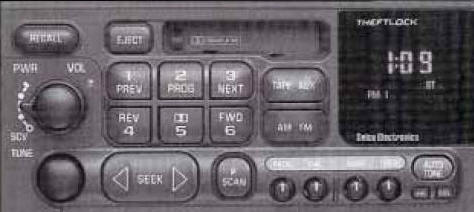
Included with the AM-FM Stereo with Cassette Tape Player and
Automatic Tone Control, are six Bose
amplified speakers. See your dealer for details
3-12
PWR-VOL: Press this knob to turn the system on and off. To increase volume, turn the knob to the right. Turn it to the left to decrease volume. The knob is capable of rotating continuously.
RECALL: Press this button to recall the station being played. If you press the button when the ignition is off, the clock will show for a few seconds.
SCV: Your system has a feature called Speed-Compensated-Volume (SCV). With SCV, your audio system adjusts automatically to make up for road and wind noise as you drive. Set t the volume at the desired level. Move the control ring behind the upper knob to the right to adjust the SCV. Then, as you drive, SCV automatically increases the volume, as necessary, to overcome noise at any particular speed. The volume level should always sound the same to you as you drive. If you don’t want to use SCV, turn the control the all way down. Each notch on the control ring allows for more volume compensation at faster vehicle speeds.
AM-FM: Press this button to switch between AM , FM1 and FM2. The display shows your selection.
TUNE: Press this knob lightly so it extends. Turn it to choose radio stations. Push the knob back into its stored position when you’re not using it.
SEEK: Press the right or left arrow to go to the next higher or lower station. The sound will mute while seeking.
SCAN: Press one of the SEEK arrows for two seconds, and SCAN will appear in the display. Use SCAN to listen to stations for a few seconds. The radio will go to a station, stop for a few seconds, then go on to the next station. Press SEEK again to stop scanning. The sound will mute while scanning.
PUSHBUTTONS: The six numbered pushbuttons let
you return to your favorite stations. You can set up to
18 stations (six AM, six FM1 and six FM2). Just:
1. Turn the radio on.
2. Press AM-FM to select the band.
3. Tune in the desired station.
4. Press AUTO TONE to select the equalization that
best suits the type of station selected.
5. Press and hold one of the six numbered buttons. The sound will mute. When it
returns, release the button. Whenever you press that numbered button, the
station you set will return and the AUTO TONE equalization that you selected
will also be automatically selected for that button.
6.
Repeat the steps for each pushbutton.
P.SCAN: Press this button to listen to each of your
favorite stations stored on your pushbuttons for a few
seconds. The radio will scan through each of the stations
stored on your pushbuttons, except those stations with
weak reception. The AUTO TONE setting stored for
that pushbutton will be automatically chosen. Press
P.SCAN or one of the pushbuttons again to stop
scanning. P.SCAN will be displayed whenever the tuner
is in the P.SCAN mode. The channel number (PI-P6)
will appear momentarily just before the frequency is
displayed. In FM mode, this function will scan through
both FM1 and FM2 preset stations and FM1 or FM2 will
appear on the display.
BASS: Press this knob lightly so it extends. Turn the knob to the right to increase bass and to the left to decrease bass. When you use this control, the radio’s AUTO TONE setting will switch to manual and the AUTO TONE display will go blank.
TREB: Press this knob lightly so it extends. Turn the knob to the right to increase treble and to the left to decrease treble. When you use this control, the radio’s AUTO TONE setting will switch to manual and the AUTO TONE display will go blank. If a station is weak or noisy, you may want to decrease the treble.
Push these knobs back into their stored positions when you’re not using them.
AUTO TONE: This feature allows you to choose preset bass and treble equalization settings designed for country/western, classical, news, rock, pop and jazz stations. C/W will appear on the display when you first press AUTO TONE. Each time you press it, another setting will appear on the display. Press it again after JAZZ appears and the AUTO TONE display will go blank. Tone control will return to the BASS and TREB knobs. Also, if you use the BASS and TREB knobs, control will return to them and the AUTO TONE display will go blank.
Adjusting the Speakers
BAL: Press this knob lightly so it extends. Turn the
knob to the right for the right speakers and to the left for
the left speakers. The middle position balances the
sound between the speakers.
3-14
FADE: Press this knob lightly so it extends. Turn the knob to the right to adjust the sound to the front speakers and to the left for the rear speakers. The middle position balances the sound between the speakers.
Push these knobs back into their stored positions when you’re not using them.
Playing a Cassette Tape
Your tape player is built to work best with tapes that are
30 to 45 minutes long on each side. Tapes longer than
that are so thin they may not work well in this player. If
a tape is inserted when the ignition is on but the radio is
off, the tape will begin playing. A tape symbol is shown
in the center oft he graphic display whenever a tape is
inserted. When a tape is active, the tape symbol will be
accompanied by a direction arrow.
While the tape is playing, use the VOL, AUTO TONE, BAL, FADE, BASS and TREB controls just as you do for the radio. Other controls may have different functions when a tape is inserted. The display will show the tape symbol and an arrow to show which side of the tape is playing.
If you hear nothing or hear just a garbled sound, it may not be in squarely. Press EJECT to remove the tape and start over.
The player is able to detect a tight or broken tape , and will eject the tape. The radio will go back to playing the last station selected.
The player automatically senses the cassette for metal or Cr02 and sets the pre-emphasis. Anytime a tape is inserted, the top side is selected to play first.
PREV (1): Press this button or the left SEEK arrow to
go to the previous selection on the tape if the current
selection has been playing for less than eight seconds. If
the PREV button is pressed and the current selection has
been playing for more than eight seconds it will go to
the beginning of the current selection. Your tape must
have at least three seconds of silence between each
selection for PREV or SEEK to work. The tape direction
arrow blinks during PREV or SEEK operation. The
sound will mute during PREV or SEEK operation. Press
this button or one of the SEEK arrows again to return to
normal play.
3-15
PROG (2): Press this button to play the other side of the tape.
NEXT (3): Press this button or the right SEEK arrow to go to the next selection on the tape. If you hold the button or press it more than once, the player will continue moving forward through the tape. Your tape must have at least three seconds of silence between each selection for NEXT or SEEK to work. The tape direction arrow blinks during NEXT or SEEK operation. The sound will mute during NEXT or SEEK operation. Press this button or one of the SEEK arrows again to return to normal play.
REV (4): Press this button to reverse the tape rapidly. Press it again to return to playing speed. The radio will play the last-selected station while the tape reverses.
![]() DOLBY (5): Press this button to reduce background
noise. Note that the double-D symbol will appear
on the display.
DOLBY (5): Press this button to reduce background
noise. Note that the double-D symbol will appear
on the display.
Dolby Noise Reduction is manufactured under a license from Dolby Laboratories Licensing Corporation. Dolby and the double-D symbol are trademarks of Dolby Laboratories Licensing Corporation.
FWD (6): Press this button to advance quickly to another part of the tape. Press the button again to return to playing speed. The radio will play the last-selected station while the tape advances.
AM-FM: Press this button to play the radio when a tape is in the player.
TAPE AUX: Press this button to change to the tape function when the radio is on. The tape symbol with an arrow will appear on the display when the tape is active. If your system is equipped with a remote playback device, pressing this button a second time will allow the remote device to play.
EJECT: Press this button to remove the tape. The radio will play. EJECT may be activated with either the ignition or radio off. Cassettes may be loaded with the radio off if this button is pressed first. If you leave a cassette tape in the player while listening to the radio, it may become warm.
CLN: If this message appears on the display, the
cassette tape player needs to be cleaned. It will still play
tapes, but you should clean it as soon as possible to
prevent damage tot he tapes and player. See “Care of
Your Cassette Tape Player” in the Index. After you clean
the player, press and hold EJECT for five seconds to
reset the CLN indicator. The radio will display to
show the indicator was reset.
3-16
CD Adapter Kits
It is possible to use a CD adapter kit with your cassette
tape player after activating the bypass feature on your
tape player.
To activate the bypass feature, use the following steps:
1. Turn the ignition on.
2. Turn the radio off.
3. Press TAPE AUX and hold for five seconds.
4. After five seconds, the tape symbol on the display
will flash. While the symbol is flashing, insert the
adapter. The radio will turn on. The CD player will
work now.
This override feature will remain active until EJECT is pressed.
AM-FM Stereo with Compact Disc Player and Automatic Tone Control (If Equipped)
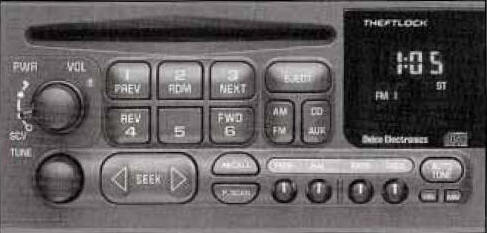
Included with the AM-FM Stereo with Compact Disc Player
and Automatic Tone Control, are six Base
amplified speakers. See your dealer for details.
3-17
PWR-VOL: Press this knob to turn the system on and off. To increase volume, turn the knob to the right. Turn it to the left to decrease volume. The knob is capable of rotating continuously.
RECALL: Press this button to recall the station being played. If you press the button when the ignition is off, the clock will show for a few seconds.
SCV: Your system has a feature called Speed-Compensated-Volume (SCV). With SCV, your audio system adjusts automatically to make up for road and wind noise as you drive. Set the volume at the desired level. Move the control ring behind the upper knob to the right to adjust the SCV. Then, as, you drive, SCV automatically increases the volume, as necessary, to overcome noise at any particular speed. The volume level should always sound the same to you as you drive. If you don’t want to use SCV, turn the control all the way down. Each notch on the control ring allows for more volume compensation at faster vehicle speeds.
AM-FM: Press this button to switch between AM, FM1 and FM2. The display shows your selection.
TUNE: Press this knob lightly so it extends. Turn it to choose radio stations. Push the knob back into its stored position when you’re not using it.
SEEK: Press the right or left arrow to go to the next higher or lower station. The sound will mute while seeking.
SCAN: Press one of the SEEK arrows for two seconds, and SCAN will appear on the display. Use SCAN to listen to stations for a few seconds. The radio will go to a station, stop for a few seconds, then go on to the next station. Press SEEK again to stop scanning. The sound will mute while scanning.
PUSHBUTTONS: The six numbered pushbuttons let
you return to your favorite stations. You can set up to
18 stations (six AM, six FM1 and six FM2). Just:
1. Turn the radio on.
2. Press AM-FM to select the band.
3. Tune in the desired station.
4. Press AUTO TONE to select the equalization that
best suits the type of station selected.
5. Press and hold one of the six numbered buttons. The
sound will mute. When it returns, release the button.
Whenever you press that numbered button, the
station you set will return and the AUTO TONE
equalization that you selected will also be
automatically selected for that button.
6. Repeat the steps for each pushbutton.
P.SCAN: Press this button to listen to each of your favorite stations stored on your pushbuttons for a few seconds. The radio will scan through each of the stations stored on your pushbuttons, except those stations with weak reception. The AUTO TONE setting stored for that pushbutton will be automatically chosen. Press P.SCAN or one of the pushbuttons again to stop scanning. P.SCAN will be displayed whenever the tuner is in the P.SCAN mode. The channel number( Pl-P6) will appear momentarily just before the frequency is displayed, In FM mode, this function will scan through both FM1 and FM2 preset stations and FMl or FM2 will appear on the display.
BASS: Press this knob lightly so it extends. Turn the knob to the right to increase bass and to the left to decrease bass. When you use this control, the radio’s AUTO TONE setting will switch to manual and the AUTO TONE display will go blank.
TREB: Press this knob lightly so it extends. Turn the knob to the right to increase treble and to the left to decrease treble. When you use this control, the radio’s AUTO TONE setting will switch to manual and the AUTO TONE display will go blank. If a station is weak or noisy, you may want to decrease the treble.
Push these knobs back into their stored positions when you’re not using them.
AUTO TONE: This feature allows you to choose preset bass and treble equalization settings designed for country/western, classical, news, rock, pop and jazz stations. C/W will appear on the display when you first press AUTO TONE. Each time you press it, another setting will appear on the display. Press it again after JAZZ appears and the AUTO TONE display will go blank. Tone control will return to the BASS and TREB knobs. Also, if you use the BASS and TREB knobs, control will return to them and the AUTO TUNE display will go blank.
BAL: Press this knob lightly so it extends. Turn the
knob tot he right for the right speakers and to the left for
the left speakers. The middle position balances the
sound between the speakers.
3-19
FADE: Press this knob lightly so it extends. Turn the knob to the right to adjust the sound to the front speakers and to the left for the rear speakers. The middle position balances the sound between the speakers.
Push these knobs back into their stored positions when you’re not using them.
Playing a Compact Disc
Insert a disc partway into the slot, label side up. The
player will pull it in. The disc should begin playing. The
display will show CD and the CD symbol. If you want
to insert a compact disc with the ignition off, first press
RECALL or EJECT.
If you’re driving on a very rough road or if it’s very hot, the disc may not play and ERR (error) may appear on the display. Press RECALL to take ERR off the display. When things get back to normal, the disc should play. If the disc comes out, it could be that:
PREV (1): Press this button or the left SEEK arrow to go to the previous track if the current selection has been playing for less than eight seconds. If the PREV button is pressed and the current selection has been playing for more than eight seconds, it will go to the beginning of the current selection. If you hold the button or press it more than once, the player will continue moving back through the disc. The sound will mute while seeking.
RDM (2): Press this button to hear the tracks in random,
rather than sequential, order. RANDOM will show on
the display. Press RDM again to turn off random play.
RDM is reset to off when the disc is ejected.
NEXT (3): Press this button or the right SEEK arrow to
go to the next track. If you hold the button or press it more
than once, the player will continue moving forward
through the disc. The sound will mute while seeking.
REV (4): Press and hold this button to quickly reverse within a track. Release it to play the passage. You can use the counter reading on the display to locate a passage more easily.
FWD (6): Press and hold this button to advance quickly
within a track. Release it to resume playing. You can
use the counter reading on the display to locate a
passage easily.
3-20
RECALL: Press this button to see which track is playing. Press it again within five seconds to see how long it has been playing (elapsed time). The track number also appears when you change the volume or when a new track starts to play.
AM-FM: Press this button to play the radio when a disc is in the player. The letters CD will go off the display.
CD AUX: Press this button to change to the disc function when the radio is on. A CD icon will appear on the display when the disc is in the player, whether it is active or not. If your system is equipped with a remote playback device, pressing this button a second time will allow the remote device to play.
EJECT: Press this button to remove the disc. The radio will play. The disc will start at the first track when you reinsert it.
If you turn off the ignition or radio with a disc in the player, it will stay in the player. When you turn on the ignition or system, the disc will start playing where it was stopped. If you press EJECT but don’t remove the disc, the player will pull the disc back in to protect it after about one minute. If you leave a compact disc in the player while listening to the radio, it may become warm.
Trunk Mounted CD Changer (If Equipped)
Your vehicle may be equipped with a trunk mounted CD changer. It is located in the rear center storage compartment. See “Rear Storage” in the Index for more information.
With the optional compact disc changer, you can play up
to 12 discs continuously. Normal size discs may be
played using the trays supplied in the magazine. The
small discs (8 cm) can be played only with specially
designed trays.
3-21
NOTICE:
Heavy objects in the center storage area which may shift or slide while driving
could damage your CD changer. Protect your CD changer by not placing heavy,
moveable objects in the center storage area.
You must first load the magazine with discs before you can play a compact disc. Each of the 12 trays holds one disc. Press the button on the back of the magazine and pull gently on one of the trays. Load the trays from bottom to top, placing a disc on the tray label side down. If you load a disc label side up, the disc will not play and an error will occur. Gently push the tray back into the magazine slot. Repeat this procedure for loading up to 12 discs in the magazine.
Once you have loaded the discs in the magazine, slide open the door of the compact disc (CD) changer. Push the magazine into the changer in the direction of the arrow marked on top of the magazine.
Close the door by sliding it all the way to the left. If the door is left partially open, the changer will not operate and an error will occur. When the door is closed, the changer will begin checking for discs in the magazine. This will continue for up to two minutes depending on the number of discs loaded.
To eject the magazine from the player, slide the CD changer door all the way open. The magazine will automatically eject. Remember to keep the door closed whenever possible to keep dirt and dust from getting inside the changer.
3-22
Whenever a CD magazine with discs is loaded in the changer, the CD symbol will appear on the radio display. If the CD changer is checking the magazine for CDs, the CD symbol will flash on the display until the changer is ready to play. When a CD begins playing, a disc and track number will be displayed. The disc numbers are listed on the front of the magazine.
If your vehicle is equipped with the AM-FM Stereo with Cassette Tape Player and Automatic Tone Control, the following buttons are used for the trunk mounted CD changer except the EJECT button for ejecting the CD magazine.
PREV (1): Press this button ort he SEEK left arrow to go to the previous track if the current selection has been playing for less than eight seconds. If the PREV button is pressed and the current selection has been playing for more than eight seconds, it will go to the beginning of the current selection. If you hold or press this button more than once, the player will continue moving back through the disc. The sound will mute while seeking.
PROG (2): Press this button to select a disc. The disc number and track number will be displayed.
NEXT (3): Press this button or the SEEK right arrow to go to the next track. If you hold the button or press it more than once, the player will continue moving forward through the disc. The sound will mute while seeking.
REV (4): Press and hold this button to reverse quickly through a track selection. Release it to resume playing.
FWD (6): Press and hold this button to advance quickly through a track selection. Release it to resume playing.
SEEK: Press the right arrow to seek to the next selection on the CD. Press the left arrow to search for the previous selection on the CD. The sound will mute while seeking.
P.SCAN: Press this button to hear the tracks in random,
rather than sequential, order. RANDOM will appear on
the display. Press P.SCAN again to turn off random play.
TAPE AUX: Press this button if you have a disc loaded in the changer and the radios turned on, to play a compact disc. Press AM-FM to return the radio when a compact disc is playing. Press TAPE AUX to switch between the tape and compact disc if both are loaded.
To eject the disc holder in the trunk mounted CD changer, slide the CD changer door all the way open and the disc holder will automatically eject.
If your vehicle is equipped with the AM-FM Stereo with
CD Player and Automatic Tone Control, the following
buttons are usedf or the trunk mounted CD changer
except the EJECT buttofno r ejecting the CD magazine.
3-23
PREV (1): Press this button or the SEEK left arrow to go to the previous track if the current selection has been playing for less than eight seconds. If the PREV button is pressed and the current selection has been playing for more than eight seconds, it will go to the beginning of the current selection. If you hold or press this button more than once, the player will continue moving back through the disc. The sound will mute while seeking.
RDM (2): Press this button to hear the tracks in random,
rather than sequential, order. RANDOM will appear on
the display. Press RDM again to turn off random play.
NEXT (3): Press this button or the SEEK right arrow to
go to the next track. If you hold the button or press it more
than once, the player will continue moving forward
through the disc. The sound will mute while seeking.
REV (4): Press and hold this button to reverse quickly through a track selection. Release it to resume playing.
(5): Press this button to select a disc. The disc number and track number will be displayed.
FWD (6): Press and hold this button to advance quickly through a track selection. Release it to resume playing.
SEEK: Press the right arrow to seek to the next selection on the CD. Press the left arrow to search for the previous selection on the CD. The sound will mute while seeking.
CD AUX: Press this button if you have a disc loaded in the changer and the radio is turned on, to play a compact disc. Press AM-FM to return to the radio when a compact disc is playing. Press CD AUX to switch between the trunk mounted CD changer and compact disc if both are loaded.
To eject the disc holder in the trunk mounted CD
changer, slide the CD changer door all way open and
the disc holder will automatically eject.
Compact Disc Changer Errors
If an error occurs while trying to play a CD in the
compact disc changer, the following conditions may
have caused the error:
If any error occurs repeatedly, or if an error cannot be corrected, please contact your dealer.
THEFT-LOCK is designed to discourage theft of your radio. It works by using a secret code to disable all radio functions whenever battery power is removed.
The THEFT-LOCK feature for the radio may be used or ignored. If ignored, the system plays normally and the radio is not protected by the feature. If THEFT-LOCK is activated, your radio will not operate if stolen.
When THEFT-LOCK is activated, the radio will display LOC to indicate a locked condition anytime battery power has been interrupted. If your battery loses power for any reason, you must unlock the radio with the secret code before it will operate.
Activating the Theft-Deterrent Feature
The instructions which follow explain how to enter your
secret code to activate the THEFTLOCK system. It is
recommended that you read through all nine steps
before starting the procedure.
NOTE: If you allow more than 15 seconds to elapse between any steps, the radio automatically reverts to time and you must start the procedure over at Step 4.
1. Write down any three or four-digit number from 000 to 1999 and keep it in a safe place separate from the vehicle.
2. Turn the ignition to ACCESSORY or ON.
3. Turn the radio off.
4. Press the 1 and 4 buttons together. Hold them down until --- shows on the display. Next you will use the secret code number which you have written down.
5. Press MN and 000 will appear on the display.
6. Press MN again to make the last two digits agree with your code.
7. Press HR to make the first one or two digits agree with your code.
8. Press AM-FM after you have confirmed that the code matches the secret code you have written down. The display will show REP to let you know that you need to repeat Steps 5 through 7 to confirm your secret code.
9. Press AM-FM and this time the display will show SEC to let you know that your radio is secure. The indicator by the volume control will begin flashing when the ignition is turned off.
3-25
Unlocking the Theft-Deterrent Feature After a Power Loss
Enter your secret code as follows; pause no more than 15 seconds between steps:
1. LOC appears when the ignition is on.
2. Press MN and 000 will appear on the display.
3. Press MN again to make the last two digits agree
with your code.
4. Press HR to make the first one or two digits agree
5. Press AM-FM after you have confirmed that the code matches the secret code you have written down. The display will show SEC, indicating the radio is now operable and secure.
If you enter the wrong code eight times, INOP will appear on the display. You will have to wait an hour with the ignition on before you can try again. When you try again, you will only have three chances to enter the correct code before INOP appears.
If you lose or forget your code, contact your dealer.
Disabling the Theft-Deterrent Feature
Enter your secret code as follows; pause no more than 15
seconds between steps:
1. Turn the ignition to ACCESSORY or ON.
2. Turn the radio off.
3. Press the 1 and 4 buttons together. Hold them down until SEC shows on the display.
4. Press MN and 000 will appear on the display.
5. Press MN again to make the last two digits agree with your code.
6. Press HR to make the first one or two digits agree with your code.
7. Press AM-FM after you have confirmed that the code matches the secret code you have written down. The display will show- --, indicating that the radio is no longer secured.
If the code entered is incorrect, SEC will appear on the display. The radio will remain secured until the correct code is entered.
When battery power is removed and later applied to a secured radio, the radio won’t turn on and LOC will appear on the display.
To unlock a secured radio, see “Unlocking the Theft-Deterrent Feature After a Power Loss” earlier in this section.
3-26
The range for most AM stations is greater than for FM, especially at night. The longer range, however, can cause stations to interfere with each other. AM can pick up noise from things like storms and power lines. Try reducing the treble to reduce this noise if you ever get it.
FM stereo will give you the best sound, but FM signals will reach only about 10 to 40 miles (16 to 65 km). Tall buildings or hills can interfere with FM signals, causing the sound to come and go.
Hearing damage from loud noise is almost undetectable until it is too late. Your hearing can adapt to higher volumes of sound. Sound that seems normal can be loud and harmful to your hearing. Take precautions by adjusting the volume control on your radio to a safe sound level before your hearing adapts to it.
To help avoid hearing loss or damage:
NOTICE:
Before you add any sound equipment to your
vehicle -- like a tape player, CB radio, mobile
telephone or two-way radio -- be sure you can
add what you want. If you can, it’s very
important to do it properly. Added sound
equipment may interfere with the operation of
your vehicle’s engine, Delco Electronics radio or
other systems, and even damage them. Your
vehicle’s systems may interfere with the
operation of sound equipment that has been
added improperly.
So, before adding sound equipment, check with your dealer and be sure to check Federal rules covering mobile radio and telephone units.
3-27
Care of Your Cassette Tape Player
A tape player that is not cleaned regularly can cause
reduced sound quality, ruined cassettes or a damaged
mechanism. Cassette tapes should be stored in their
cases away from contaminants, direct sunlight and
extreme heat. If they aren’t, they may not operate
properly or may cause failure of the tape player.
Your tape player should be cleaned regularly after every 50 hours of use. Your radio may display CLN to indicate that you have used your tape player for 50 hours without resetting the tape clean timer. If this message appears on the display, your cassette tape player needs to be cleaned. It will still play tapes, but you should clean it as soon as possible to prevent damage to your tapes and player. If you notice a reduction in sound quality, try a known good cassette to see if it is the tape or the tape player at fault. If this other cassette has no improvement in sound quality, clean the tape player.
Cleaning may be done with a scrubbing action, non-abrasive cleaning cassette with pads which scrub the tape head as the hubs of the cleaner cassette turn. It is normal for the cassette to eject while cleaning. Insert the cassette at least three times to ensure thorough cleaning. A scrubbing action cleaning cassette is available through your dealership.
You may also choose a non-scrubbing action, wet-type cleaner which uses a cassette with a fabric belt to clean the tape head. This type of cleaning cassette will not eject and, it may not clean as thoroughly as the scrubbing type cleaner.
After you clean the player, press and hold EJECT for five seconds to reset the CLN indicator. The radio will display --- to show the indicator was reset.
Cassettes are subject to wear and the sound quality may degrade over time. Always make sure the cassette tape is in good condition before you have your tape player serviced.
3-28
Handle discs carefully. Store them in their original cases or other protective cases and away from direct sunlight and dust. If the surface of a disc is soiled, dampen a clean, soft cloth in a mild, neutral detergent solution and clean it, wiping from the center to the edge.
Be sure never to touch the signal surface when handling discs. Pick up discs by grasping the outer edges or the edge of the hole and the outer edge.
Care of Your Compact Disc Player
The use of CD lens cleaner discs is not advised, due to the risk of contaminating the lens of the CD optics with lubricants internal to the CD mechanism.
Power Antenna Mast Care (Option)
Your power antenna will look its best and work well if it’s cleaned from time to time. To clean the antenna mast:
3-29
NOTICE:
Don’t lubricate the power antenna. Lubrication
could damage it.
NOTICE:
Before entering an automatic car wash, turn off
your radio to make the power antenna go down.
This will prevent the mast from possibly getting
damaged. If the antenna does not go down when
you turn the radio off, it may be damaged or
need to be cleaned. In either case, lower the
antenna by hand by carefully pressing the antenna down.
If the mast portion of your antenna is damaged, you can
easily replace it. See your dealer for a replacement kit
and follow the instructions in the kit.
Integrated Windshield and Rear Window Antennas (Option)
The antennas in your vehicle are located in the
windshield and the rear window. The connectors are at
the top of the windshield and the top of the rear window
above the rear window defogger.
3-30
.